Perlesandco 468x60

Wednesday, February 29, 2012

BTW - 29th February 2012

Here we go, my very first Bead Table Wednesday post :)

This week I've actually been working on three different projects, lol. Too many balls in the air *chough*!
At first I was working, very focused on a celini spiral project (we'll see what it will turn out into), but I after a while I got bored and wanted to try out something else that I've been having in mind since a while. Of course I'm gonna finish up the celini spiral, I bought the 5/0 pink seed beads only for this purpose so, heh :p

The second project I ended starting is a pair of circular brick stitch earrings with two round 12mm Swarovski pearls together with Swarovski bicones and some Miyuki and Toho seed beads. I saw this tutorial on YouTube about these pair and decided I wanted to try it, since they look really cute; I'll provide a link to the tutorial in the post where I'll post the finished earrings - the link is on my PC and I'm  on my laptop at the moment :)
 The purple circle you can see next to the finished earring is an experiment of mine. I'm trying to create a pattern for a circular peyote stitch using twin beads. I have a design in my sketchbook that I wanted to use something like this for. I'm not 100% satisfied with the one that is on the photo yet, and I need to alter it a bit more until I'll get what I'm after.

The very last thing I managed to finish up after I've been working on it for a week or two is a two-drop peyote cuff pattern.
I decided to work on normal paper with a pen since I seem to do that better then directly on the computer for some reason, lol. I'm going to either scan it or paint it into the computer later, we'll see. Here's a little preview of it anyway :)

Monday, February 27, 2012

New layout for spring 2012

As some probably already have noticed there's a new layout up and running on my blog.
I thought it was time to clean out those cold winter themed colors and get something new up and running. It is after all, a new year.

What do you guys think about the black, grey and white theme I scrapped together? :)

Friday, February 24, 2012

Memory Wire Bracelet

I've been having memory wire bracelet in 10 loops (I think) laying around since some time now... Probably about a year now... I've only used it once when I did a one looped bracelet that.. Ugh, I don't like anymore :D
I guess if you look back at a year from when you created something you can notice that your skills and techniques evolved way pass that.

Anyway! :D
I decided on making something small using two of the loops this time, lawl. I've still been staring at those darn peach colored pearls that I used a couple of to make that CRAW rope with earlier. And the thought of them together with some intense blue color just... Damn , I had to do it! So I combined them with the very last of my turquoise pearls in the same size together with some white AB spacer beads and made a cute little bracelet.
I actually like it, heh.

Awesome Supplier!

Okey, I ordered from this supplier (Perles & Co.) last month for not that much since I wanted to try 'em out. They are located in France, which isn't that far from here, and they offer free shipping for European buyers if the order is above 50€, how great isn't that!?\

I bought from them again this week and thought I would share my treasure :)
Here is the first part of my order - everything didn't fit on one photo, lol!
I just love those screw jars and I bought one more :)
Since I wanted to try out that SoNo beading thread I decided to buy white and black. They weren't that expensive (4.50€) and you get 100m per spool. The size is about B and they only exist in 6 colors.
I had to stack up on some hypo cement as well :d
I also bought those Miyuki beading needles since I saw a video review about them on YouTube that caught my interest. Apparently they are suppose to be harden then the Jhon James needles I normally buy.
I've been wanting to buy some more gemstone chips and this time I ended up with coral; they are just stunning and will definitely come in handy for some fringe work :)
Besides that I also bought some 15/0 miyuki seedies in 3 colors and 3mm bugles, and some swarovski flowers, bicones and 12mm pearls :3

 Here is the second part. It's mostly beads from Preciosa :)
5/0, 9/0, 11/0 and 15/0 seedies, two colors of twin beads, 20mm bugle beads, 12mm fire polished glass beads.

Think you can see a bigger, more detailed pic of the photo of you click 'em if you're interested in seeing what the colors are named :p

Polymer Clay Cabs 6 (emerald)

Here we go again. A result of my latest polymer clay addiction since I got my lovely-dovely pasta machine :D
 Here we have the cabochons that I made using the same cane technique as I used for the tear drop beads in my "Polymer Clay Cabs 3 (magma)" post. This time however, I managed in making that darn skinner blend 100% perfect, yay!! \o/
The color I used for this cane was emerald green, white (skinner blend combo), brown and black. I'm not gonna explain how to do the cane again, so don't worry ^^

I had to try making one of these "bicone" like beads after getting a hand of the technique - actually it's way easier then what it sounded like. For me anyway, lol.
I simply first made a ball of black clay and then I cut off very thin pieces of my cane and rolled it to a round ball, making sure that the cane layers would be stuck nicely without any air bubbles.
Then I made it into a bicone shaped bead which I made into a pendant since I came to like it a lot. I'm just wondering in what I should use it, but that will probably come sooner or later into my mind, heh.

This cab was really funny to do, heh. Well, I used cut off access clay from the cane before I made a spiral of it. I simply layered the clay as I wanted it into the mold and then I added black clay and pressed it down to make one single solid form of it.
I must say that I really like the end result of it, regardless that it indeed is an experiment of not wasting clay, lol.

Thursday, February 23, 2012

Earrings: Victorian Twist

I just had to use (almost) the very last Tila beads in the antique rose color I had, and make something out of them. And yeh, a pair of earrings!

I began sketching out and planning, experimenting a couple of times to get exactly what I wanted. I decided already that I wanted to use the same colors and the same beads I used for the Victorian Twist Bracelet I made yesterday, I just had to think how on earth I would be able to put it together so it would look nice, without looking too messy.
At the end I think I managed to execute it perfectly and I'm very happy with the result. The transparent hyacinth beads really are light catchers and just looks stunning when the light hits 'em.
I knew that I also wanted to incorporate those cute little heart beads to the earrings as well, and lucky for me, there was a space in the attachment of the loop where I could add a wrapped loop of a head-pin with the heart together with some seed beads of the same color scheme.

I'm not really sure how big they are; maybe the center (think circle-like) of a woman's palm. Sorry, I don't know what I did with my ruler, it will probably pop up soonish, lol.

I'm currently working on a tutorial for this earring, which I'm going to add later :)

Wednesday, February 22, 2012

Bracelet: Victorian Twist

I've been having these gorgeous Tila beads in antique rose that kinda reminded me of Victorian Renaissance fashion. Might just be me, but that's how I ended up with the color scheme I picked for this little set.
 I have some transparent lilac lined light rose that just fitted perfectly together with the Tila beads. These two colors were kinda nice, but I wanted to add a little different twist to the color scheme to make it "pop". I decided to add hyacinth orange in with the other two colors.

For my first project I decided on making a bracelet, using the Tila beads as the main focus. I just simply used ladder stitch to make three different rows with the Tilas. I then joined them together by adding the hyacinth colored seed beads in between like a cross. To add something a little extra I also decided to add a hyacinth heart bead here and there in a pattern where I would normally add the hyacinth orange seed beads.
I used the transparent lilac lined light rose seedies for a picot fringe just to cover up that thread on-top of the Tilas.
And yes, of course I had to add that lilac/amethyst acrylic button for this one (I used one also for the purple weaver bracelet made out of twin beads) since it fit so nicely onto the open clasp I made. At first I was going to add a heart shaped clasp, but after trying that out I decided to just add the button. The metal (silver or gold) just took away the attention from the bracelet itself, so I felt that I had to kill that since the bracelet was the main focus of it (duh, lol).

Saturday, February 18, 2012

Hair Barrette: Yellow Daffodil

Okey, so I couldn't help myself and I had to make this; a beaded Daffodil. A bit early for Easter I know but... I wanted to! lol

I saw this pattern in "The Beaded Garden" by Diane Fritzgerald about making a beaded daffodil and I just had to try it out. The flower is really just built up from brick stitch and herringbone stitch, and then the parts are joined together.

I purchased a pair of hair barrettes about two weeks ago and I knew I wanted to attach this beaded flower to them, after all... What girl doesn't like flowers in her hair? I know I do, lol. Even better with beaded flowers then real once since they won't die, heh :p

When I decided on how I wanted to attach the flower to the barrette I added a head-pin in the hole of the barrette and then through the space in the center of the flower.
I wasn't satisfied at this point though, I thought it looked a bit too naked with the flower alone, so I googled up pictures as references to see how the leaves of a daffodil looks like and created my own brick stitch base based from that :)
 Of course I had to use glue to make it sit in place, stuck on the hair barrette, I'm not too much of a fan of gluing and gluing but... I didn't really see how else I could solve it. With the head-pin alone, after I had wrapped a loop it would still spin around and I guess the only way to fix that was using glue. If anyone has a greater idea I would love to hear them so I could use them for future project :)

Friday, February 17, 2012

Item of the Month: Beading Needles

This month I wanted to put some focus on probably one of the most important tools a beader needs; beading needles. How are you going to get that thread through those small beads several times without a beading needle if you don't have one?

Needle Sizes
The most common sizes of beading needles are size 10, 12 and 13, but there's also a size 15 beading needle which I haven't really come across myself from any of the suppliers I'm currently using. Therefore, I'm not sure how common the size 15 needles are.
Size 10 is the most common used needle all in all and it goes easy through 11/0 seed beads.
The size 12 beading needles are thinner then the size 10 (basically the higher the number, the thinner the needle) and can pass through beads a lot more often than the size 10. The size 12 can also pass through 15/0 beads a couple of times way easier then a size 10. Personally I recommend to work with size 12 while including 15/0 seed beads rather than a size 10 of the facts that that big a needle, if you force your way through the 15/0 seed bead, it will break the bead.
The size 13 beading needle can handle a lot more pressure then any of the other sizes, since it's so thin. So why wouldn't you just stick with size 13 and dump the other sizes? Because the size 13 beading needle isn't just thin, it is also very fragile. So depending on what kind of work you want to do, you should always consider the choice of size on the needle you want.

Why can't I use an ordinary sewing needle instead?
Simple; because the eye, where you thread your thread is normally way too big for passing through the beads, and the needles themselves are too thick. The beading needles are after all manufactured for the single purpose of working with beads.

Brands
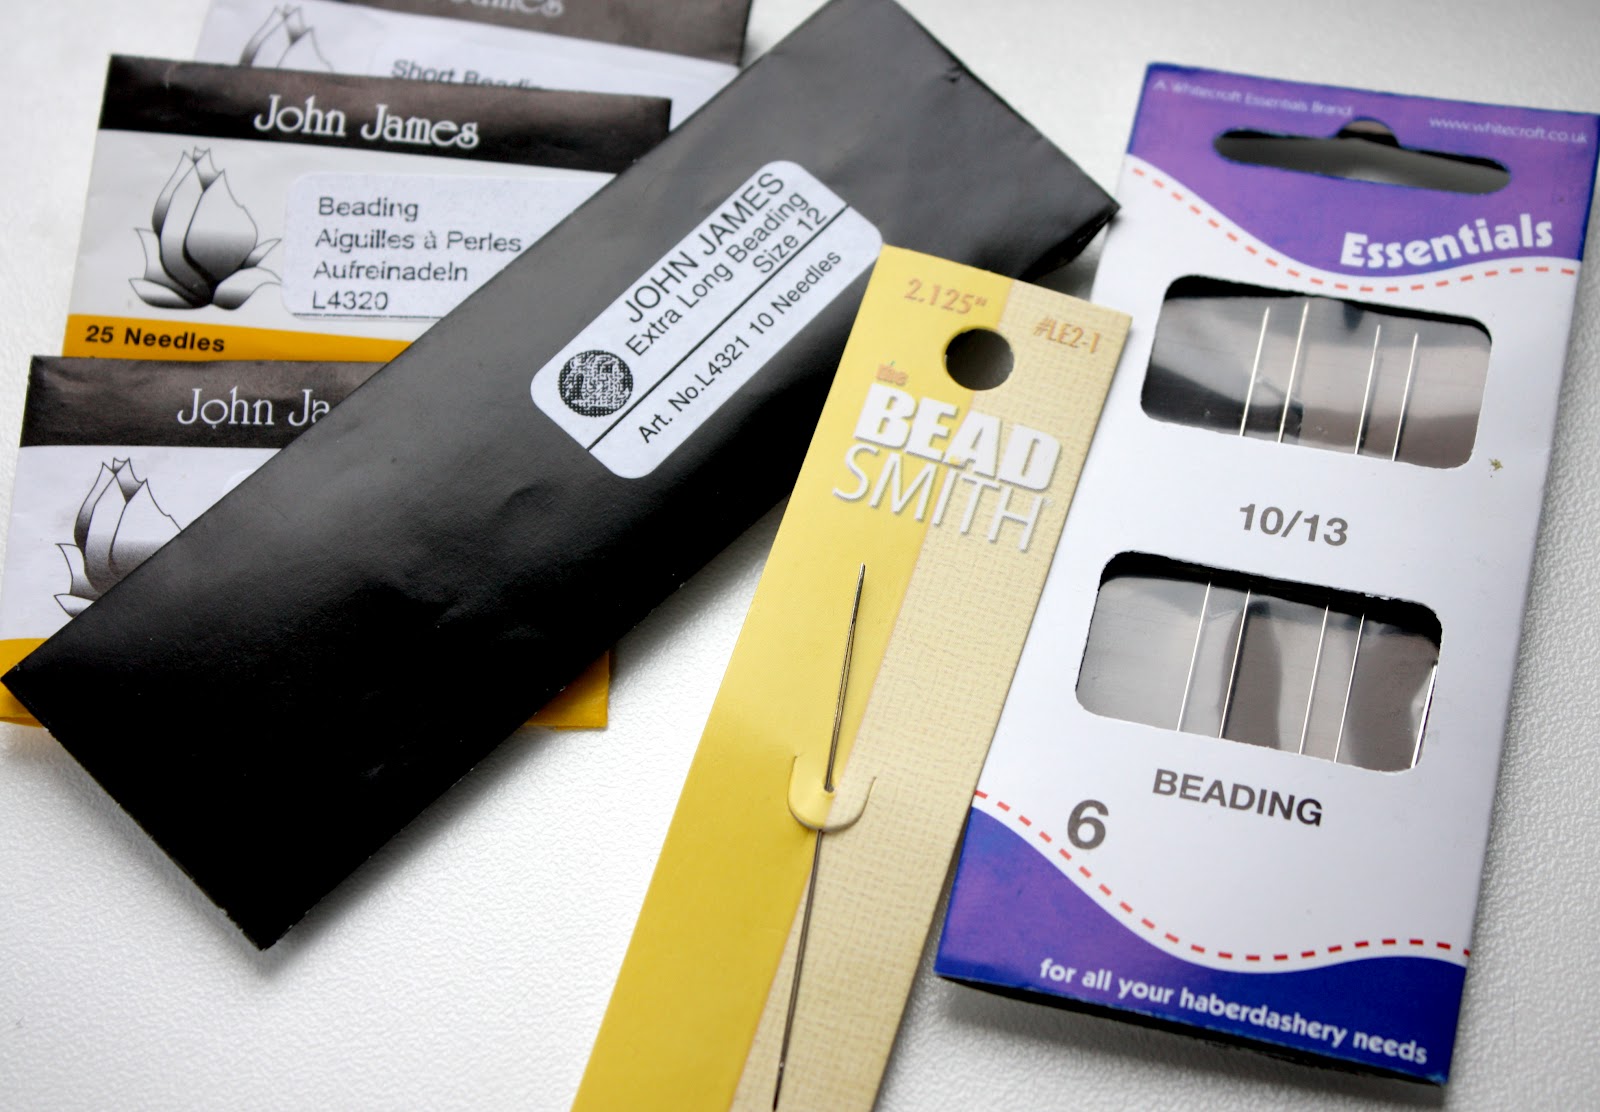
I think, from my own experiences... The most common needles are the John James needles. They exist in sizes 10, 12 and 13 with a range of different length on the needles; short to very long (see photo). I've seen them on all the bead suppliers I've come across, so I'm just making the conclusion that they are the most common beading needles. From my own experiences, the short beading needles make a great way for bead embroidery when joining the backing together with the beaded surface, since they don't get crinkled so easily as a normal size needle.
Last month I decided to try out some Miyuki Beading Beedles I saw on Perles & Co. for 2.50€ since I was curious to try my hands on something new. I could immediately feel the difference between the John James and the Miyuki needles while working with 'em. The Miyuki beading needles are a lot more harder and doesn't get crinkled as easily as the John James, which makes them last a lot longer. However, they did have some problems passing through more then twice through those 15/0's. The Miyuki beading needles arrived in a gift card "package" which also had a needle threader together with the 6 needles. There are also some simple instruction printed on the inside of it.
The Bead Smith carry those big eye needles which comes in handy when threading your beads onto something that the small eye of an ordinary beading needle can't handle. I've been using them for passing elastic thread through beads when I've been wanting to make an elastic bracelet or something like that. Clearly you can use it for a lot though.

Monday, February 13, 2012

Polymer Clay Cabs 5 (purple randomness)

This collection of polymer clay is kinda random...
I tried my hands on making another kaleidoscope cane (two middle cabs) from some purple and white left over clay together with some silver clay. I suppose that they are nice but I'm not entirely happy with them :)
The cabochon out to the left is made from left over from the kaleidoscope cane I made before joining  them together.
The two bigger cabochons are made of course also with left overs that I ran a few times through the pasta machine to see what I could get if I did this and that, and folding that corner with that corner etc. :)

Polymer Clay Cabs 4 (permafrost)

And here we have the second collection...


What I did with this cane was that I first created a cane of purple and sapphire blue. I then ran the cane through the pasta machine on the thickest setting and began experimenting with a random shape. After I was satisfied with that, I added a layer of white clay on it and then I began shaping the cane into a triangle. I then cut the triangle into six pieces and added them together to get a kaleidoscope effect. At this point  I pressed the dull side of my blade into for areas of the cane and then pressed the space I created together once again and added another layer of sapphire blue clay around the cane. 

Polymer Clay Cabs 3 (magma)

My boyfriend came home on Friday with a pasta machine from his work, since I had asked him if they were selling any at the store he's working in. I am a very happy girl, lol!

Anyway.
I took the pasta machine out for its first spin on Saturday and damn... It's addictive! Think I made three different canes and about three collections of cabochons, just as I wanted them, heh.
I didn't really do anything specific when it came to the canes. I simply experimented my way forward and saw how the results ended up looking.
Something I had a problem with to get right in the beginning was to make a skinner blend, heh. After my second try, I managed to get it perfect.


Okey!
Here's the first collection of cabochons...

The cane I made for this bunch is rather simple, as you can see...
This was my very first attempt at a skinner blend, not entirely a perfect skinner blend, but it works for this to be honest. What I did was to do the skinner blend and use that as the base for the cane. Then I added a very thin layer of black clay around the skinner blend base. I then added a thin sheet of gold above the black and then another thin black sheet on the gold.
Here I rolled out the cane and then I cut it in pieces, till then attach the pieces a bit here and there next to each other. The pattern kinda reminds me of a turtle shell...
As you can see on the tear drop cabs in the lower right corner, they look completely different then the other cabs. I used what was left of the round cane I made in the start, then I simply flattened it an ran it through the thickest setting on the pasta machine to later roll the clay up to create a spiral. after I had the spiral I did the same thing as on the first cane; divided the cane in parts and then pressed them together to get this spiral like effect.
As for the cabochon just to the right above the tear drops, I just used some cut off access clay from the cane and mixed it randomly and then pressed it into the mold :)

Sunday, February 12, 2012

February Challenge

It's a blue and a green theme this month in the challenge at "Operation Tackle That Bead Stash!" and I decided to create a pair of Swarovski bezeled rivoli earrings.
To get directly to this month's challenge, click here.

I've been wanting to create these specific earrings with a frame like a star around the rivoli for a while, but I haven't really found any tutorials for it, so... I took an afternoon and began sketching it out, and experimenting on how I could make a star-like pattern. After some fiddling and calculating I finally managed to get it right.

When the shape of the star was completed I had to try my way around to attach the flat back stud-earrings behind the rivoli without trusting glue. Of course I used a little bit of glue to keep them in place. After it had dry I began to work on a decreased circular peyote stitch to embed the needle of the flat-back stud-earrings into the beadwork so it would also look nice from behind.


After I completed the backs of each earring I began to add some extra embellishment around them. I decided to use up those gorgeous capri blue 4mm bicone crystals from Preciosa and some of the 15/0 light blue frosted AB seed beads that I had used for the star frame in the center of the earrings.

I also got to use my only thread roll of K.O beading thread. I bought it just to try it out, to see what the differences were compared to Nymo. The only difference I noticed immediately was that the K.O is a bit harder and stiffer than the Nymo. I know some people say that K.O fray a lot less then Nymo, but I couldn't really tell that, it just frayed at the same amount as Nymo, heh. I might buy more of the K.O in the future though, since I actually liked working with it, and the K.O has different kind of colors then the Nymo.

Saturday, February 11, 2012

Broach - Pink Bow

I've been seeing these simply adorable beaded bows around the web ever since I began blogging myself. I've been wondering how exactly they are created. They look like some sort of peyote stitch creations, no? Actually they are created from four brick stitch diamonds in two different sizes and then joined together.

You can have a look at the pattern yourself by clicking here. The website is in Russian, but it's pretty easy to understand and to figure out since the graphs are pretty clear.

I had no idea what to do with the finished bow once it was completed, I just wanted to make it, heh =P
Although, in the end I decided to glue it stuck to a broach back and make it into a broach. My very first one, lol. At least I bought some broach backs if I would end up making one in the future, even if I don't really use 'em myself.

I used 11/0 crystal lined pale rose (name of the color) seed beads to create it.
The broach is about 5cm (2 inces) in length.
I might even end up making more of these since I kinda fell in love with them, lol! Nah, I just find them darn cute :)

Friday, February 10, 2012

Wish List: February

Here are some goodies I've been checking out this month :)

White Natural Mother of Pearl Cabochon from HobbyPerline.
Moss Agate Cabochons from HobbyPerline.
Peacock Daggers from Perles & Co.
Fan Shaped Green Turquoise Cabochon from Perles & Co.
Jet Midnight Blue Twin Beads from GJBeads.
2" Flat Bracelet Cuff from GJBeads.
Miyuki Dyed Opaque Mulberry (0662) 11/0 Delicas from Bricolart.
Round Amber Cabochon from Bricolart.
Wavy Brass Cuff from Robin's Beads.

CRAW earrings - Cubes

Okey, So I just had to do this...

I had been staring at the blue bugle beads I had laying on my bead mat together with some seed beads in peach, and I just couldn't get the color palette out of my head.

Yesterday I decided to make a pair of earrings using this combination. They ended up as little cubes made in one unit of cubic right angle weave.
I used a two needle technique to make them though, and instead of normal thread I used nylon since it gave the cube a stiff feeling. I tried Nymo earlier but the result was just too loose and the cube didn't really stay to the shape I wanted it to.

Wednesday, February 8, 2012

CRAW rope - Peach

I spent the last two days working on a cubic right angle weave rope.
I wanted to get some more practice working with CRAW so I decided on making an opera length necklace that you can fold in double around your neck, or make a know with... And other stuff, lol.

I decided on a pretty simple pattern when I made this. I wanted 10 units of CRAW and then a 6mm glass pearl in the same color.
The seed beads I used were 11/0's and in peach with a frosted AB finish, and I think this works as an advancement to flatter the 6mm glass pearls I added. It kinda makes 'em stick out a lot more then if I would have been using just peach opaque or transparent :)


I just managed to get a hold of these gorgeous glass pearls when I went to the craft store in the nearby city; they had a 50% discount on everything jewelry related that they had stuffed in a box. Of course I had to dig my hands in there... And I made some other treasuries then just these beads! :D

Monday, February 6, 2012

Wrapped Bracelet

Mhmmm...
I haven't been able to get my mind off of these wrapped bracelets for quite a while. I mean... They are all over the web, and have been at least since the beginning of last year - They probably been around longer but last year is when I began paying attention, lol!

I had this dark blue/grey cotton cord laying around since last spring and I decided to actually put it to some use, together with some blue roundel beads that I have been meaning to use for... Well, something.
That something happened to be a wrapped bracelet in the end, heh.

It wasn't really that hard to make once you got a hang of it. There are a lot of different tutorials out there, all you need to do is use Google. I didn't really use any specific tutorial for reference since I watched a few videos about it to see how people made them in their own way, although they are pretty much the same; all of the tutorials for this bracelet :)

CRAW Star

Okey, so I was bored, and I was too lazy to even bother about making a 3D beaded star using this tutorial that I found on how to make 'em.
The simple reason to that was that I had to create two separate stars using right angle weave and then stitch 'em together.
I had tried my hands on this last month and for some reason I screwed it up and some of the units on one the stars was way out of what it was supposed to be.
So I laid this project on ice...

Yesterday I began to ponder about the 3D beaded star again and I couldn't help but thinking how it would end up if I would use cubic right angle weave instead of simple, flat right angle weave. It ends up into a 3D shape when stitched together anyway, no?

And yarp! It worked, I have now I perfectly beaded 3D star hanging in a key-chain from my bag, lol.


It wasn't really enough with just the cubic right angle weave to get the star tho. When everything was stitched together the star was kinda loose and way too flexible. What I did to give it a more solid shape is that I added a few beads on each side of the outer sides.
I did the same for the inner edges, but I had to remove the beads again, as that made the star look too much like some sort of flower, and that was definitely not what I was trying to get, heh.

Thursday, February 2, 2012

Handmade Polymer Clay Beads

I purchased one year of Bead Magazines iMag last week and it's been like christmas to be honest :D
Not only do I get to read the issues that are getting released this year, but I can even browser back and read ALL the previous issues as well! So awesome! :D

*cough* Anyway.
I read one of their back issues and saw this great article about polymer clay beads and how to keep their shape so they won't have that annoying flat edge they normally get if you just put them on the surface you stuff in the oven with the clay. Corn flour, was the answer! I decided to create two different types of polymer clay beads and then fill the plate I put 'em in with the corn flour. And heck, it worked! Now I have perfectly rounded beads :)

The first 6 beads I made are aprox. 14mm and I sat and slowly and carefully carved out the decoration pattern I wanted on 'em. When these were baked and had cooled down and hardened I added some acrylic silver color on them, which I smeared out, so it would fill the uneven parts, and the holes in the beads. I then wiped off the color with a napkin until the only thing of the color that remained was in those gaps and holes.

For my second type of beads, I actually used some left over clay from the bigger focal polymer clay bead I created by using a carving technique. I first made a cane of a base color, and then I used two other colors to layer them around it. I then carved away clay here and there so I would get all the way into the other color layers, to make them appear to the eye. I then shaped it into a cylinder and made a hole.
The smaller beads made with the left over clay are aprox 10mm, and the only thing I did with these was to measure them into equal sizes, using eye measurement and then roll them into balls.

I used varnished on all the piece from FIMO when I was satisfied with them, after they had cooled down and hardened :)

Choker: I Desire You

Phew!
After almost two weeks of work it is finally done :)

I created this choker especially for a contest on DeviantArt, hosted by Supernatural Art, Psycho Artist United and High Quality Art.
The contest is called "I wish you were here" and has a love/valentines theme around it. To access the contest directly for more information, click here.

I sketched the design for my piece out a couple of times before I decided how I wanted it. I already knew I wanted to have a bead embroidery heart as the focal for the entire piece. After already working on the heart for a while I decided that I should add two small pieces of St. Petersburg chain on each side, to connect to the heart.
The reason to why I chose a St. Petersburg chain is cause I find that it looks kinda romantic and dreamy in some sort of way, lol. That's the best way I can explain it *cough*.

I used a bunch of different beads, besides 11/0 and 15/0 seed beads for the heart; bicones, 4mm rounds, czech glass beads in different shapes.


In the design I had also drawn out some dangling bead strands that I would add. I wasn't sure before the basics of the piece were finished if I would add this. Altho, in the end I decided to add them, since it game more life to the choker and made it less... naked =P

As for the back and the attachment of the choker...
I added a chain, so it would be able to fit a lot of neck sizes :)
I used a lobster clasp, as well...
I decided to add a little Czech glass heart for weight in the chain.
Related Posts Plugin for WordPress, Blogger...