Perlesandco 468x60

Tuesday, December 24, 2013

Merry Xmas & Happy New Year and a GIVEAWAY!

I know I haven't been blogging a lot lately, my apologies. But yes, been very, very busy and I really haven't taken the spare time I have to blog, rather I prioritized my beading :)

Anyway, Xmas is today (in Scandinavia and in lot of other countries around the Baltic Sea we celebrate the 24th - it has to do with that we used to have the old Norse believes) and 2013 is soon at an end, so I'm feeling extra spirited and I've been wanting to host a giveaway for some time I just didn't know when. But since it's the holiday, I figured this is the perfect time.
My little way of saying thank you to everyone out there that love and support my work. Of course I would love to give each and everyone something, but that isn't possible.

So, what will you be able to win and how?
The necklace in the photo I added in this post is what I'm letting one random, lucky winner get.

All you have to do is like my FB Page AIFDesign like the correct photo and share it. When I've reached at least 100 likes I'll draw a random person from my like list.
The giveaway is open to EVERYONE.

Friday, November 8, 2013

Necklace: I Believe

So the latest piece I created is this little necklace I made using, well mainly bead embroidery as usually.
I didn't really have a clear idea of what I exactly wanted to do, but yeah, a pendant to start with. So it became ones of those things that manifested over time as I was working on it. For some reason I find that type of creating the most relaxing, since it provides you with such a great amount of freedom.

At first I ended up picking out a filigree with a fairy motif that I've been having in my stash for ages, I think it was ones of the very first materials I ever bought, and then it just ended up staying there as I never found a purpose for it. So I ended up playing around with that and the rest of the focal pieces I had chosen to work with. Some I actually decided not to add when the piece began to take form.

I just ADORE the seed bead color I chose for this (Toho #284 - gold lined aqua), but sadly it's so darn hard to find it from any supplier. I think I ordered the 20 gram I still had stored away from Beadaholique.com, that I ordered through Amazon. I've found another carrier of the color in EU that I'm gonna order from when the time comes. Sadly, I haven't found anyone what so ever that carries the color in other sizes then 11/0, and I need 15/0 as well! Ah, well...

For the chain I decided to make a St. Petersburg chain (one of my very favorite chain stitches), well two, as I wanted to attach each one of them to the upper parts of the pendant and create a V shape.

Have you ever wanted a seed bead color but had a very hard time finding it?

Friday, October 25, 2013

Necklace: Innocence & Nicole's Bead Backing

A few months ago I purchased one of the fabulous cabochon packs from "Wir War Kralen". The main reason really to why I purchased from them (haven't ordered from them before) is cause I saw that they have "Nicole's Beadbacking". Lots of ppl from the US. have been saying how great it is and how much more affordable it is compared to Lacy's Stiff Stuff, which is the beading foundation I use in my pieces.
At their site you could choose to either order an A5 or and A4 size format, which is great since the A4 is a lot bigger then the biggest piece they sell of lacy's.  Nicole's Beadbacking also comes in a variety of colors, which of course is the plus point; no more dying or permanent marker drawing.
Now... Comparing the prices, I did not find it to be more affordable then Lacy's. In fact including the extra costs I have to pay for shipping it over from Holland (I order my Lacy's from France) makes it really not worth it. Or maybe the store is just overpricing it? I have no idea. I would compare it with other suppliers of it if I could find another one in the EU who sells it. But so far, I have only found one.

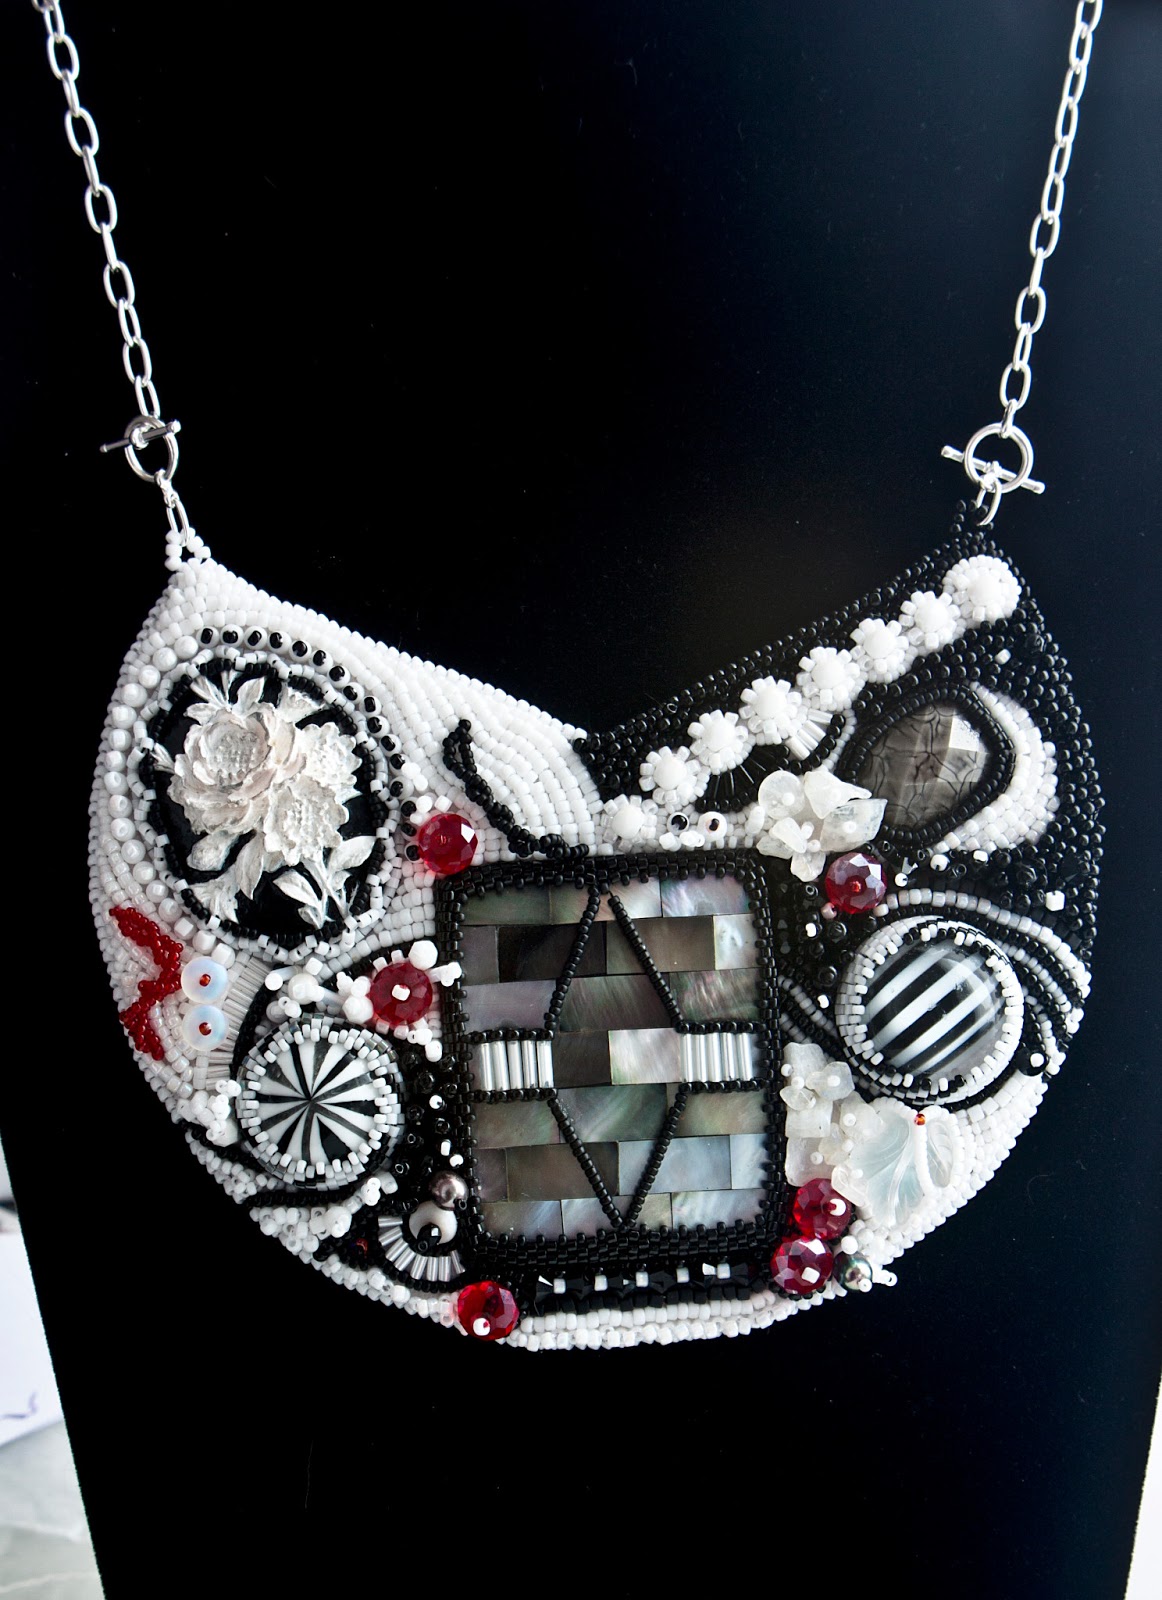
So going over to the necklace I made with the Nicole's Beadbacking...

First off, the design concept for this one pretty much came over time, after playing around with the different materials that were included in the cabochon pack. I knew I wanted to make another necklace, so I first drew out a 14cm in diameter circle on a paper and calculated the center of the circle. Then I began to play around with the cabochons I had, placing them on various places and I also ended up adding some materials that I already had in my stash for some time that really fit with the rest.

For the first time I felt that I wanted to make a bead soup and use it as a primary material in the bead embroidery. Now, if you've seen any of my previous pieces you can pretty much see that a lot of them are color blocked in some basic way (basic in my opinion lol). I wanted to jump out of that comfort zone again and give myself a little bit of a challenge. I'm a bit of a perfectionist in the way my head works, so just starting to mix all the different seed bead colors in a bunch really scares me. What is worse is when I began to pick up the beads is that my brain is telling me pick up that color then that color after etc. when what I should really be thinking is "nothing" and just pick up the beads in random order.
Well, I followed those guidelines I put out for myself, noticing that I was actually struggling with it as I was working. Still I think I did a pretty good job, so I'll give myself a little pat on the back, heh.

Tuesday, October 8, 2013

Necklace: Lady of Time & Glass Eyes

I realize I haven' t been blogging very often lately; I have to admit that I haven't really been in the mood. I've also been doodling off on a few larger pieces which I don't really find worth blogging about as it's nothing major.

A few weeks ago I got my hands on that face silicone mold from Sculpey and I ended up playing around with them and made a couple of faces from it. One of the bigger one, I ended up embellishing with some more clay and cogs, to end up with a bit of a steampunk style.

I really felt, after I had finished it that I wanted to make a necklace of it, but I was stuck on what kind of necklace I wanted to make. So after picking out some matching materials and laying them out on a circle template I played around with the placement of the materials along with the face until I saw exactly what I wanted.

I'm absolutely in love with the Khaki iris (#2035) beads by Miyuki since I decided to stack up on that color in different sizes and shapes. I thought the color was a perfect complimentary color, not only for the polymer clay face but also for the other main materials I had chosen to work with.

Something that has, or is still going around are those gorgeous eye cabochons - I just LOVE them myself and I've purchased a couple of them from some sellers on Etsy.
I've been wanting to try to make my own, but I haven't really had the required mats until now. I found a few sellers on Ebay whom are selling those clear glass cabochons for a very nice price/bulk so I decided to get myself some of those.
And now I've also got my photo printer working, and got my hands on some Canon photo paper so I decided to play around in Photoshop to make my own. Printed them out and glued them. I actually though that the ink on the paper would get smeared out from the glue, but it doesn't. I think it might have to do with the photo paper, not sure. Anyway, it was a success and thought I would share a photo of them.

Monday, August 19, 2013

Polymer Clay Cabochons & Necklaces

Okey, so I've been taking some interests to those fabulous polymer clay cabochons with flower motives that I've been seen going around the web, and being used in different types of jewelry and accessories.
I've been curious on how to make my own, and when I did some research about them I've noticed that they're either called filigree or "embroidery". I would guess that they're called embroidery cause you pretty much use a basic needle tool that you work with clay to "attach" a small piece of clay into the clay base you want to attach them on...

So yes, I finally took some time and decided on making my own. As I did I also thought I would use the Premo Poly Clay instead of the FIMO, which I've always have been using so far. Darn! I love Premo, and I wish I had a lot more. I found the Premo in Perles & Co.'s webshop, as the reason to why I have a load of FIMO is cause that is the most common brand they carry in hobby stores over here.

I'm sharing a few pictures of what I've made in polymer clay way...

I've also used two of the ones I created so far. They ended up as pretty simple necklaces. I didn't want to make something too complicated, as I know that too much can distract from another pieces; in this case I wanted to put focus on the polymer clay cabs so I kept it pretty simple design wise.

Currently I'm also working on a little different project where I also ended up using one of the yellow/green gradient flower cabs I made and posted in this blog-post. But I'm not gonna post any preview piccies of it, so I'll just wait until it's completed :)

Tuesday, July 23, 2013

Playing with Soutache

I think it was last year I bought a couple of soutache braids in a few different colors, and I ended up making a pair of earrings that I... Well, lets be honest; I wasn't too happy with them as the braid ended up looking a bit "bulky" and I'm a bit of a perfectionist when it comes to lines and curves; they have to be perfect!
Since then I haven't really been in the mood to play around with soutache. Not because it wasn't fun, but because the lack of tutorials out on the web wasn't many. Nor were there any good books out there for the technique. If there were, I never came across them, even if I poked around and asked other beaders in the different bead groups I'm in on FB.
I've seen that there's a very good book out there now, that got released this month; Soutache by Anneta Valious. I'm probably gonna end up purchasing it when the budget allows me to, heh.

I have no idea what it was that suddenly awoke the interest to play around with soutache again, maybe I needed some variation from what I've been doing? *shrug*
Anyhow, I suddenly remembered that I purchased a wonderful polymer clay cabochon on Etsy by the lovely Alexandra Chereches. Her Etsy shop is opened pretty recently, but she sells a lot of beautiful creations where she incorporates the stunning polymer clay cabochons she makes herself. She also has a few cabochons for sale. You can access her Etsy store by clicking here.
I thought that the cabochons would look very good if I used it with soutache braid so I went and played around with the few colors I have of the braid until I ended up with a result that was pleasing to my own eye.

I'm probably gonna play around some more with soutache, not gonna wait as long as I did last time to pick up the braids tho, but I actually enjoyed working with this technique so there will most likely be more to come :)

Saturday, July 20, 2013

Winter - Summer Creations 2013

Since it's been about half a year since my last video, I thought it was time for another one. I think it's fun to make vids. so why not put it together like this, heh.

Enjoy :)


Hair Clip: Siren's Song & Rizo Beads

Yeah, I just couldn't help myself...

I still had the materials out on my bead mat from my previous piece; Necklace: Siren's Song. The materials were really shouting at me inside my head that I should create a hair piece with them, in the similar style as my necklace. I haven't create too many hair pieces, and I ended up choosing to make a hair clip. I kinda had a silhouette in my mind that I wanted to bring to life - using a few of those mother of pearl discs that I included in the necklace.

I liked how the cube beads layered up and gave a lot of shine and a different kind of texture, the way I placed them in the necklace, so I wanted to keep that in the hair clip.

In the necklace I also added those (relative) "new" Rizo beads, just to experiment, and really see what sort of texture they could bring into bead embroidery. I know, the Rizo bead has been around now for at least some months now, but I'm always careful when I buy a new type of bead (don't ask me why, I just am), I mean... Questions starts to pop up in my head: What can I use them in? What colors should I pick? How many grams should I buy? etc. Sometimes I just go on instincts when I buy my beads and sometimes I actually has a plan when in comes to bead colors. I must admit I had exactly the same dilemma when those Twin beads were out last year. I only bought a couple of different colors and some of them I ended up using, some of them I still haven't touched. See were I am going with this?
I've always found it handy to have a big stash and I still do, but what if you would end up getting that question in your head when you're about to buy beads; Will I ever end up using them? I mean, having beads stashed away that you'll never probably gonna use is just taking up unnecessary space.

How about you? Do you sometimes experience dilemma when buying beads? Have you ever given those "Rizo" beads I mentioned a try yet or are you planning to?

Saturday, July 6, 2013

Necklace: Siren's Song

Yesterday I managed to finish up my latest necklace piece and get a pretty decent photo of it...

I had been having a vision of a necklace with Turquoises a few months in my head before I actually started working on this piece. My dilemma was that I didn't really have many turquoises in my stash so if I wanted to create this piece I would have to have patience and wait till I could purchase them. One thing I learned when I did my purchase of a load of turquoises in both bead for and as cabochons is that they are one of the most expensive gemstones you can get your hands on - I already knew they were expensive before, but I learned that the polished stones are even more expensive then tumbled stone, hah.

I wanted to try something a little different when I created this necklace. Looking back at some of my previous designs I noticed that I've barely created any piece at all that contained a lot of stop stitch; when I've seen other bead artists creation I've noticed that the stop stitch provides a lot of texture to a piece and that is what I wanted to accomplish.

I also got my hands on some of those new Rizo beads and I wanted to try and see how they would look in bead embroidery if I would just basically stitch them down to the foundation. The result is pretty neat and it definitely created a whole new type of texture, almost like fish scales. Think I need to get my hands on some more of those and in different colors cause they really put me in the mood to experiment a  bit more with 'em.

I also spent some hours at creating myself a new logo I could put on my photos ones they are ready and approved by myself to be put out on the internet, heh. So yeah, I actually had some fun going back to PS to play around and doodle with different ideas and then put them together into something I felt could last for quite some time.
I created two different versions of the logo; the smaller version with less text and then a version that contains a bit more and is bigger.

Thursday, June 13, 2013

A little "big" ring

I know I'm myself one of those that love wearing rings, and of course I love making them. Nothing says as much about a person as a ring created in your own style in your own opinion.
Some of the very first beading projects I started out making were beaded rings. I haven't really been doing any beaded rings including bead embroidery to be frank, until now.
Why? Cause a ring is always personal and sometimes to make rings also to a consumer you need to know their ring sizes, and that I've noticed varies a lot from person to person.

Last month I decided to purchase some adjustable ring bases cause I wanted to go crazy with those "scrap" cabochons I have laying around, that I have absolutely no idea what else to make of.

So yesterday I looked through some of the resin cabs I've made and I noticed a bronze colored one which I've made using some bronze colored PearlEx powder. It was very hard to capture the real beauty of the effect that the PearlEx powder gave the resin, but the pigment really "swirls" around (not actually moving, heh) with sparkles.
I played with the cabochon on my ring-finger and thought it would look really cool as a ring even with it's giant size (approx. 2.5cm - 1"). I decided I would use some earthy tones and execute it in a simple way to make a bohemian styled piece. I've never really done anything in that style before so it was a bit like stepping out of my comfort zone at the same time even if the design is pretty simple.

I found creating these rings so fun I've actually already put some cabochons I want to use like this to the side, and some I've already glued on to some beading foundation and then I can start beading on them whenever I get in the mood to take a little break off of those bigger pieces I'm still working on.

Have you tried your hands yet on making beaded rings? If so did you enjoy it?

Tuesday, June 11, 2013

Bead Embroidery Pendant I

About a week ago I came over these three Swarovski crystal flat backs (a circle and two squares) in my stash. I'd completely forgotten that I had them and to be honest, I had no single clue what I should do with them. At first I had plan on doing something separate with each one of the pieces; like a pair of earrings with the square ones etc.
However, as I kept staring at the three pieces laying there on my worktable together I couldn't not help myself but to start arranging them in different orders and in different shapes together. I immediately scratch the earrings idea and came up with a pretty simple looking pendant piece. After I had ponder how I would also attach the pendant into a chain I remember that delicate looking silver-plate chain I had bought some months ago and decided to run with that. The chain wouldn't take away too much attention from the pendant and it would also keep the piece simple.

The pendant itself is created with bead embroidery a long with the Swarovski crystal flat-backs and 11/0 delicas and 15/0 seed beads by Toho and Miyuki in different shades of gray, along with some 1.5mm Toho cube beads in a gold luster amethyst color that looked very complimentary with the round flat-back. Also to add a little extra touch of color I tossed in two pieces of Malachite chip beads. After I'd played around with the shape I also added a little Swarovski tear-drop bead to dangle down.
The pendant ended up measuring almost 5cm (2") excluding the Swarovski crystal tear-drop.

Saturday, June 8, 2013

Necklace: Forest God

So yes, I've been a bit distant from blogging the last few weeks. Well, the basic reason is that I've had my mother over from Sweden for 15 days, so I haven't really been doing anything jewelry related as of late :)

However, the moment I got some spare time to work on one of those bigger pieces I decided to finish up everything on the "Forest God" necklace I've been working on. I don't think I've posted any "teaser" or w.i.p photos of it, so I suppose this is gonna be a bit of a "surprise".

I didn't really have any "main" plan in mind when I did this one. The thought I had when I began to doodle out the design was that I wanted to make something in green, a necklace preferably; the pantone color of the year 2013 being emerald and all, and since I've already done a bead embroidered cuff last year in that color I thought a necklace would be refreshing.
I had a few green focals in my stash that I wanted to use for this one, and the main one I wanted to include is the green dyed abalone in the very center. After I began to play around with the ones I had and created a template that would work and places out the different cabs on places where they would look good.

Okey...
After working on it I ended up seeing a freaking dragon's face in it, and I still cannot get that out of my mind when I stare at it, lol. I asked my mom for an opinion when she was here and she saw something completely different; a butterfly...
So I'll just leave it at that and let everyone decided for themselves what they see in it, if they see any odd-looking-shapes-or-faces :P

Finally I also managed to find a wonderful jewelry bust display that measures 35cm in height, waaaay bigger then what I had laying around. I think the biggest I have is about 20-25cm in height so those extra 10cm is like a blessing. I found it from a retailer at the German Amazon site, and yes I am very, very happy with it :)


Tuesday, May 14, 2013

Bracelet: See Me

I wanted to share with you (my readers) the most recent piece that I created. A bracelet, yet again, created with bead embroidery. Yep, yep... Bead embroidery is definitely the medium of beading that has got me hooked! I'm probably repeating myself about that ones in a while in some posts, but that's just cause I feel so passionate about it! ^^;

So yeah, this bracelet...
First time creating a bracelet like this without using a brass cuff sandwiched between the beading foundation and the backing. Why? I wanted to make something different. I've been having it in my mind for some time that I wanted to create a bracelet which uses buttons as a closure, but in a way so that the bracelet itself would overlap and hide the buttons. You probably get the picture of what I'm trying to explain...

The first thing I did before beading was to play around and create a pretty basic template that I could work with. I first cut out a strip from an A4 paper, I measured how wide I wanted the bracelet to be, then I used that strip and put it around my wrist and began to measure it out until I found it just perfect.

I knew that I wanted to use different shades of blue colors in the bracelet so what I did first, naturally, was to pick out some cabochons that would look nice to play around with. Since I didn't have a specific design in mind, I simply just put the cabs in random places and stopped playing around with them until I felt that they were in the right position. The exception with the randomness was with the 18mm Swarovski rivoli though, as I placed that in the middle on purpose.

I'm definitely going to create more bracelets like this one in the future. I've already got the inspiration in mind for what I want to create next. However I think, well I will put out the basic rule for myself - I'm not going to start on another one of these bracelets until I've finished at least one of the big collars I'm working on, lol!

Do you also have a bunch of different projects going on at the same time? That just keeps piling up?

Tuesday, April 30, 2013

April Challenge

Phew! Didn't think I would be able to finish this and also get a pretty decent photo of it.
I decided to join in with the April Challenge at "Operation Tackle That Bead Stash!", this month again.
This time the challenge was a bit more about interpretation. The theme was the "beach" basically, and the task at hand was to bead something that is inspired by the theme. The extra twist for the challenge was to incorporate shells in the piece, whatever it be beads, chips, real shells etc.

I started out with a pretty bright color scheme; I noticed this ceramic pendant in a sand-like brown color with some bronze color splashes, and with a golden luster when the light hits it. I then remembered that I had some shells stashed away that I had picked ages ago with my grandma and her husband when we were in Norway - last year I snatched some of those with me when I were visiting them during our vacation.

I laid the two shapes in front of me and began sketching out a silhouette, experimenting and sketching out something that looked good to me.
Now, the shape of the pendant was 100% clear to me, I just began to ponder what I should attach it to. I wanted something slinky and organic looking, and at first I though about making a twisted herringbone rope but at some point I felt that making a beaded rope might actually ruin that "slinkyness" I wanted.
In the end, I looked through my drawer and noticed some of the c-lon beading cord and found a silver grey and a sage green color which looked perfect together. So yeah, I decided on making a braided kumihimo chain for the piece :)

Friday, April 19, 2013

Necklace: Fairy

With mother's day approaching (it's always the last Sunday of May in Sweden so yep, that's the schedule I'm following, heh), I got this little vision of making a little pendant with a chain that wouldn't be too complicated, since I wanted the pendant to be the focus.  Since my mom is gonna be here during mother's day I wanted to make her something a little more special then last year.

What I did when I started the process is that I saw one of the Swarovski rose colored rivolis that I still had, which I already had made ready for using in bead embroidery. I wanted to use this one as the focal and then the plan was to pretty much after bezelling it with peyote, working around a pretty basic shape in free-form - see where it would go as I progressed.
At first I planned on using the freshwater pearls like I used in the bead embroidery earrings I posted a couple of weeks ago. I created a pretty basic flower shape, using the freshwater pearls as petals. However, the concept changed after I stitched down the very first freshwater pearl, and I decided to just keep one of them stitched down. I liked the silhouette so much and I felt that making more petals like that might have made the piece look overworked, and that was the last direction I wanted to go in.

I'm not sure if my mom will see this blog-post or not as I know she doesn't always read it, so I'm willing to take the risk that she's too busy to see it, lol.

Thursday, April 18, 2013

Bead Embroidered Necklace I

About two weeks ago I got a request from a friend of my bf's who asked me if I could make him a necklace that would be a gift for his gf.
I asked him a few questions to know what sort of basic directions I could base the design of. He told me a budget, and gave me the two basic colors purple and black. He also wanted me to incorporate the letter "E". It's the first letter of his name, he told me that he wanted the piece to remind her of him. Obviously he gave me pretty simple things to go after, I mean I could basically do whatever I wanted sticking to those guidelines he gave me.

The first thing I did was to find a few focals/cabochons that I could use for the necklace, then I placed them out in my sketchbook and began to doodle a basic silhouette. After a few minutes and experiments I ended up with the silhouette you can see on the photo of the finish product.
I thought that using only purple and black would be a bit flat so I decided add gold into the design as well, makes it a bit more "royal" I suppose.

As for the chain the pendant is attached to, I didn't want to be too complicated so I layed out a pretty basic design on my design board; a single strand of round Czech glass beads in sizes 8 and 4mm. I also used 11/0 seed beads and just before the long strand of 4mm round Czech glass beads starts I added a 6mm round blue sandstone bead on each side to make the fading of bead sizes look more smoothly towards the end.

Friday, April 12, 2013

Bead Embroidery Ring II

Yesterday I was a bit bored and I wanted to get a little variation with what I was doing so I decided to take one of my 8mm hematite cabochons and glued it to some interfacing. After that I decided to play around a little bit with beads, using the hematite cab as focal for a little ring.
Nothing too complex really, I bezelled the cab using circular netting; since I've been giving netting a try when it comes to bezelling cabs in bead embroidery, I just sometimes can't stop so when I have a number of beads that is dividable by three I just can't help myself but to use netting, hihi.

The ring is pretty basic. The little edging, which I think gives it that little extra is created with different edging techniques combined in a way that completes the shape of it.
To attach the completed work onto the ring base I just used some E6000 - the ring is adjustable as well.

Something I know I have a problem with when I create rings is to determine the size... I mean we all don't have the same ring sizes, so yep... Even if I do love to wear rings myself I don't tend to create them that often, only cause of this. Think I should invest in some more adjustable ring bases to get rid of some of the cabochons I have in my collection that I just know I won't be using for anything major.

Saturday, April 6, 2013

Necklace: Lickerish

The design for this necklace was pretty random when I started. What I wanted to do before I began to bead this one is that I was browsing through my little gemstone cabochon collection and I found this cab that stood out from the rest of them. Again, I have no idea what sort of gemstone it is as I've bought it in a mix pack. The things that attracted me to this one is the amount of details and shades the cab has, and I began to play around with a different set of seed bead colors to see what would look good along with the cabochon.

To give the piece a little extra flare, I decided to embellish the pendant itself with some labradorite chips. I had a very hard time capture it on photo and it doesn't really show, but each one of the chips have that shiney gather of colors when the light hit them in the right place.

I just get the feeling of some lickerish flavors when I stare at this piece, so yeah... That's why I named it that way, heh.

Wednesday, April 3, 2013

March Challenge Piece for OTTBS!

Yep, I realize that this post is about three days late, I apologize for that ^^ Been a bit occupied here, been having a terrible cold for more then a week and it's finally starting to clear out of the system :)
For the March Challenge at "Operation Tackle That Bead Stash!" the theme was to use at least three different pastel colors and that extra twist was to incorporate leaves in the piece.
When I saw the theme of the challenge I wasn't really too keen to participate in it as I normally don't feel that drawn to pastels, but for some reason, four days before the deadline I suddenly felt very, very inspired to create something using this theme. I found a kind of a limeish colored gemstone cabochon in my gemstone cab collection (I have no idea what gemstone it is, but a few months ago I found a picture that showed a very similar gemstone, and it was called lemon-quartz; again no idea if that is correct *shrug*), that looked great together with some of the pale lavendelish colored beads I had in a tube.
I began with gluing the cabochon onto some foundation, then I played around with the bezel which I created in netting. After that I began to play around with the shape, and see what sort of beads looked good and how I would place them onto the foundation to make it look just as I wanted.

When I finished, just to that point when you look at what you're creating and you have that little creative voice in your head telling you that "this is just perfect". That voice that tells you to stop, I've noticed that if you sometimes don't listen to it you can end up over-designing whatever you were working :P
At this point I wasn't really sure what I was going to do with this piece; A pendant? A brooch? In the end I decided on a pendant. I wanted to keep the chain as simple as possible so I just used the basic colors I picked out from the beginning and went with it. The chain is created with the simple Russian spiral stitch, and I used 11/0 and 15/0 seed beads for it, to make it so thin as possible.
Working a Russian spiral stitch with 15/0 and 11/0's, I think! Took the double amount of time it takes when I would work with 8/0 and 11/0's or with 9/0 and 11/0's.

Saturday, March 23, 2013

Pendant: Ocean Sprite

I've had this project on the side as I've been finishing up some of the bigger pieces I've been working on.
I began to work on it again when I finished up the previous piece I posted in the blog-post I made before this one.
If you've read some of my previous posts, the one called "Forest Sprite" and "Twilight Sprite", you can see that I've been starting a small collection in this sort of theme. I have an idea for each one of the pieces I want to make, I just lack some materials, so this one is probably the last one I'm gonna make for a while, at least until I stack up on the materials I need :)

For this pendant, which I call "Ocean Sprite", I wanted to capture the essence of the ocean. To make it more fluid I started out with basic curved lines, to resembles waves. I also ended up creating a very basic hombre effect, going from cobalt blue, which would resemble the dark depths of the ocean into a lighter turquoise color, resembling waves reaching for the surface. To create a sort of sea-foam effect I used seed beads with an opal effect surface treatment.

Personally I'm very satisfied with this piece and it says what I want it to say, from my own point of view of course, then it's up to each and everyone to make out what they want of it :)

 Have you ever tried to invoke a special feeling in your creations?

Friday, March 22, 2013

Bead Embroidery Necklace

Been some time now since I had time to blog last time, my apologies :)

A few days I managed to finish up another bead embroidery piece, but we've been having it really dark and gloomy, weather wise, and I prefer to take my photos using the daylight rather then a lamp etc. So yes, I've been waiting patiently for the weather to clear up a bit so I could get a somewhat decent shot of this necklace. I have to admit tho, that I really had a hard time getting great photos of this necklace, maybe cause it has a lot of black and white? *shrug*

The idea from the beginning when it comes to this piece came a bit random to me. I was cutting out the new template I made for another bead embroidery collar I'm working on, and one piece of paper which I cut out ended up with the exact silhouette as this necklace has. I liked the shape of it so I decided to take it to the next level and make a, yeah, as you can see... A necklace :P

I've been wanting, for some time now, to create a black and white piece and that was the idea I had in mind. But indeed, as I worked I ended up incorporating some greys and some faceted red roundel beads. When I was playing around with the red beads in various places I couldn't help myself but to incorporate them, cause they were really "screaming" at me.
I also, finally, got to use the patched up shell cabochon I bought last year from an Etsy seller in the US. The person has two separate shops and he/she sells almost the same stuff in each of the stores; Balibagus & Cabcabana, I strongly recommend for you to take a look, especially if you're interested in hand-cut gemstone cabochons and hand-carved bone, the selection is wonderful and the seller keeps updating with new products at least ones a week, if not more :)
Related Posts Plugin for WordPress, Blogger...