Perlesandco 468x60

Friday, June 29, 2012

Set: Cassiopeia

Yeh, I actually liked the palette and the theme I created for my previous post; the Cassiopeia cuff and ring and I decided to create a matching necklace for it. Nothing too complicated, but nothing too simple either, so I decided to create only a pendant that would hang from a delicate gold chain.

I used almost the same beads as I used on the other two creations for this set; the gemstone is the same, just with a different shape. 11/0 and 15/0 seed beads by Toho (gold ones here are also in a permanent finish), 11/0 seed beads and 3mm bugles by Miyuki, 2x 12mm Swarovski rivolis in two different green shades (the same as for the cuff), 2x freshwater pearls and one 4mm glass pearl by Gütermann. The only thing I didn't incorporate, which was in the previous two design was the 3mm Swarovski bicones.

For the finish of the pendant I was first planning on creating a fringe for it, but after observing the piece when I had cut it out from the Lacy's I though that a fringe might make it way too much for the piece itself to handle. Who knows? That is just how I felt at that point and that is still the was I feel today as well.
The bail I just decided to keep simple; ladder stitch, without any embellishing at all. I didn't want to take too much attention away from the pendant itself.

Monday, June 25, 2012

Cuff & Ring: Cassiopeia

Yesterday I managed to do the last finishing touches on my bead embroidery cuff that I posted a preview picture on, in my last Bead Table Wednesday post.

I stuck to the promise I made myself and actually kept on going in free-form style to create it. First I finished up one side, until that one was completely covered, then I moved on to the opposite side to cover that.
The cuff is 28mm wide.


Two weeks ago I received my copy of "Sensational Bead Embroidery" by Sherry Serafini, and I was thrilled! She has a lot of nice tips on how to add certain elements into bead embroidery. And one section that really interested me was how she incorporates rivolies. I decided to test this technique out myself and added two 12mm Swarovski rivolies to one side of this cuff. The trick is to attach the rivoli to a separate piece of beading foundation (Lacy's Stiff Stuff in this case), and cut a circular hole in it which the rivoli will fit in, without falling out. Then you simply sew that beading foundation onto the part where you want the rivoli to sit. Sherry explains it much better then me, plus there're nice illustrations in the book to help you understand.

Next to the two rivolies I also decided to add a bit of a "fun" touch to the cuff; I added some leaves I made with beadweaving, and it looks sorta cute to be honest, heh.

Today I decided, just for fun, to create a matching ring to go with the cuff, since I have exactly the same type of gemstone cabochon as the one I used for the cuff - I actually have to rest my case in my thoughts of those being Zoisite gemstones since I'm not really sure anymore!
The ring is adjustable, so to add.

Besides the materials I've already mentioned, I also used: 11/0 and 15/0 seed beads by Toho (the gold ones are in permanent finish), 11/0 seed beads by Miyuki, 3mm bugles by Miyuki, 4mm round glass pearls by Gütermann, 3mm Swarovski bicones and 2x freshwater pearls.


Thursday, June 21, 2012

Jewlelry Design Star

I decided to participate again, this month in Artbead.com's "Jewelry Design Star" with my "Hecate Necklace".

♥ All support is most, and very appreciated :) ♥

Wednesday, June 20, 2012

BTW - 20th of June 2012

This Wednesday I have a couple of resin project laying around, and yet another bead embroidery piece...

I was so happy this Monday when the order I had placed with Beadaholique arrived in the mail. I ordered from their Amazon site, as always...
What I had bought was 8oz of Ice Resin, which I've been wanting to tryout for over a year now, but the time to order it haven't really been right. I ordered the basic 8oz kit, which contains small measurement cups and some stir-sticks. With the resin I also ordered a couple of molds which contained different shapes; round in 20mm and 38mm, squares in different sizes and another round with four different sizes in it.

For my first try I decided to experiment with some pearlx powder that I normally apply to polymer clay, but I've read somewhere that they should work with almost anything to get a metallic like effect. Actually, they worked out perfectly for the project I did and I'm very happy with the lavender ones. The bluish ones, are... Okay. I should have waited for the resin to dry a bit before adding the items in there since they went directly to the bottom, lol. At least it's a learning process :P

Besides the resin journey, I'm also working on a bead embroidery cuff. The center piece is a Zoisite gemstone. I've actually been doing this cuff with free-form; adding as I go without any real design, only a color palette in my mind. So far there are Toho seed beads in sizes 11/0 and 15/0, glass pearls from Gütermann, 3mm bugles by Miyuki and some dyed freshwater pearls.
With this cuff I'm kinda stepping out of my comfort zone; I'm such a symmetrical control freak and I become really annoyed with myself as I've noticed in my previous projects that I always try to get everything 100% symmetric. I decided this time, that no matter how much my brain struggles with tis urge, I'm gonna do everything to deny it! lol...

Tuesday, June 19, 2012

Earrings:Ouran

Yesterday I was playing around with circular peyote stitch and some 8mm "round" wooden beads that I bought last week. 

About half a year ago I made a couple of earrings with circular peyote stitch, and then covered 8mm round glass beads with it.
The wooden beads I got last week aren't really 100% round, but they are a little flat on each side of the hole, which gave me a little bit of a problem...

I used the same pattern I did half a year ago. What I did then was to make two separate halves of circular peyote stitch and then joined them together around the 8mm round bead. However, when I tried to do the same thing on these wooden ones, it didn't really work out. First of all; the pieces of the circular peyote stitch were too small and wouldn't cover the wooden one so I had to add one more row to each one of the circles.
Well, they fitted around the wooden bead, however their form wasn't really round anymore. Instead they ended up looking like pillows.

Even if I didn't get entirely what I wanted, I kinda ended up liking the shape of these little cute pillows and decided to go through with the plan of making a pair of earrings.

The beads I used are 11/0 seed beads by Toho and 6mm Swarovski bicones, to give the earrings some more shape rather then a flat little "pillow" dangling down the ear tip.

Sunday, June 17, 2012

Necklace: Hecate

Finally, it's done :)

I was having trouble with fringing for a while, at least in the bottom area. In the end I decided to add just a simple amethyst drop with some seed beads and 4mm Swarovski bicones along with some blue sandstone beads.
Jeez, I think I tried out three different kind of fringes at the bottom, and no matter how many I tried, it just didn't look good. Still, it looked kinda naked and I felt that something needs to be added, and I think personally that the drop does it.

As for the sides, I already had a fringe pattern in mind that I felt would work. At first though, I added the beads I wanted to work with out on the bead mat to find a sequence that would make it. For that fringe I used 11/0 and 15/0 seed beads, freshwater potato shaped pearls and 4mm Swarovski bicones.

After wearing it, I found the piece looking just finished, but yes, it is also very heavy on the front. I decided to add some heavier beads as a counter weight in the back of the necklace.

Besides the materials I've already mentioned, I used mostly 11/0 seed beads from both Matsuno and Miyuki, but also 11/0 and 15/0's from Toho.
The two cabochons on the lower sides are spangled glass caboshons. The center piece and the smaller ones are black onyxes, the redish one in the bottom, I have no idea; I received it in a mix. At first I thought it could have been some coral, but I rest that case since it doesn't really have any of those resemblance - instead I think it's a dyed milk quartz... I have a milk quartz in my collection, and this stone actually has the same surface shines that the milk quartz has, but in a different color.
The stones next to the focal are blue sandstone chips and the blue crystal like cabs above the spangled glass ones are just simple glass flat backs.
As foundation, as always, I used Lacy's Stiff Stuff and of course Ultrasuede for the backing.

Friday, June 15, 2012

Bead Haul I

This month I've been sinning a bit more then usual...
I've made some minor bead orders and a bigger one that I would like to share with you here :)

Here are some freshwater pearls that I purchased from SilverSense. Each one of the strands are aprox 15inch.

And here are some storage tubes, a glass donut, goldstone chips, green turquoise chips and I've been wanting to get my hands on that Jewelry Shield for quite some time and now I have a bottle :) These are from Perles&Co.

 Here are some Swarovski sparkle that I had to stack up on; 3 and 4mm bicones, flowers in three different sizes, flat back cabs, pearls. I've been wanting to try out those neon pearls from Swarovski ever since they were released, so I bought some 4 and 8mm'ers and I must say that they are gorgeous and have such a vibrant color! These are from Perles&Co.
Here are some gemstones, mostly cabochons. I bought a gemstone mix that contains 50grams of assorted gemstone cabs, but besides that I bought some loose ones; rose quartz, abalone, sodalite, howlite, goldstone and tiger's eye. I think I managed to figure out some of the gemstones that were included in the mix; Rhodolite, Unakite, Zoisite, Serpentine and a fossilized squid is one. The light green one I have no idea what they can be... Any suggestions? :)
These are from Perles&Co.

Wednesday, June 13, 2012

BTW - 13th of June 2012

So here's my very last preview of the necklace I've been working on for a while, using bead embroidery. It is almost done. The embroidery is completely done and the Lacy's Stiff Stuff has been attached to a piece of Ultrasuede that I found perfect for this piece.

The other minor things I've added on the necklace are a couple of freshwater pearls and some Swarovski crystal flowers to give the necklace some more "bling".
I've also used a lot of 15/0 seed beads for the final touches of it. I've never used 15/0's in such a wide range in my bead embroidery pieces as I've done in this, and I must say, I really enjoy working with them and I'm definitely going to use them even more in the coming future.

What I'm also planning on adding to the piece, to give it that little extra, is a fringe that I've been having in my mind for quite some time. As soon as the edge is done, I'm moving on to that a-s-a-p :)

Saturday, June 9, 2012

Simple Delica Bracelet

First I have to make a confession...
I have always been a bit skeptical about buying delicas or any cylinder beads at all, since I found them rather expensive from place to place. The second reason to why I haven't bought any is also cause I have a hard time picking out what colors I want, since there are... I think over 600 different ones.

So on Thursday I decided to put my stubbornness to the side and buy a couple of different colors. I bough about 10g of black opaque since I know that the main color I mostly work with is black. Then I also bought 5g of each a cream color, gray, crystal/coral lined and transparent coral.
I was actually surprised how many delicas there are per gram, compared to ordinary seed beads. And they are so... Perfect in shape and size, mostly all of them.

I wanted to try my hands on a peyote stitch pattern since I know a lot of people prefer to work delicas on peyote since they are even in size. I admit, working delicas with peyote makes the piece so much nicer then working with ordinary seed beads.
The pattern I chose to work with is from Bricol'Art, and can be found in their "Bead and Win" section on their website for free.

Thursday, June 7, 2012

First Kumihimo Attempt

I was so happy this morning when the mail arrived and I noticed that one of my orders I've made arrived. My second order from Bricol'Art. I'd ordered a Kumihimo disc and some C-LON Beading Cord in a couple of colors to start with.
I've been wanting to try out Kumihimo for quite some time now and finally I was able to! I have to say, that it is a real fun technique and also very relaxing. With the Kumihimo disc from "The BeadSmith" you also get the basic instructions so you can start.

I went to Youtube and checked around for some tutorials, and there's a lot of different schemes out there to follow, and the video tutorials for the basic 8 strand braided cord is very easy to follow, and you can grasp this technique pretty quickly.

For my very first Kumihimo braid I went with three different colors; mahogany, chinese coral, tangerine (name of the colors of the cord). I was really pleased after a couple of rows, when the braid began to take shape, so I kept on going until I had a length of 44cm in total. There I stopped, and began to remove my cords from the board.
To make sure it wouldn't ravel up again, I secured each end with some matte tape and then trimmed each end with the tape on so I could safely add some E6000 to the tips and then slide them into the exterminators.

As this was my first Kumihimo project, I wanted to keep it pretty simple. I found a ceramic doughnut that I bought about a year ago since I found it so pretty, even though I wasn't sure I would be able to use it. Guess I was wrong, heh =P
The only thing I did was to make a simple loop through the doughnut and then move both ends of the cord through the loop and tightened it and measured it so they would be even long. I also decided to add some E6000 at the loop, so the pendant would keep sitting in the same position, so it wouldn't have to be adjusted over and over again.
Closeup of the cord itself.

Wednesday, June 6, 2012

BTW - 6th June 2012

I know I haven't been very active on making new creations lately :)
But, I'm still working now and then on finishing up that bead embroidery necklace that I posted the start of a few weeks ago.
The concept is still almost the same as it was then when it comes to color. I remember how I wrote that I might add some silver later and mainly stick with black beads in different finishes. I've so far incorporated silver seed beads in both 11/0's and 15/0's. After playing around with those wonderful, bright leaves here and there on the design, I actually decided to add them to it, and I think it fits nicely so far.
Yesterday, I played around with some flat backs (German glass, I think) that I've been having in my stash for about one and a half year. The dark blue shine on the flat backs gives a real nice contrast to the piece, and it fits the concept I decided to go. I actually already named the piece, but I won't say what until it's completely done. I also only show a bit of the design on the photo, since I don't want to spoil it too much :)

Last week I also decided to buy some stuff that I've been wanting to add to my stash for a while. I bought some brass cuff links in different sizes and one brass collar link from Robin's Beads. So far they are the only supplier that I've stumbled upon in Europe who sells these, I mean the brass collar links :) Currently, Robin's have them in three different sizes, so I might buy even more later!

I also decided to make my very first purchase from Bricol'Art. At the moment they have a 10% discount on all their metal findings, and I strongly recommend you to take a look.
I've already made my second order from them, and after it arrives I think I'm gonna make a review about them, we'll see :)

Saturday, June 2, 2012

Wishlist: Coral

About a month ago or so I decided  to buy a strand of Bamboo Coral chip beads since I was really curious about how they actually look in real life, compared to what I've seen on photos.
Darn, they are really beautiful! They have such a brilliant red color that I just love.
I decided to put together this short article with a couple of different coral beads and cabs, mostly with bamboo corals.

I think they harvest the bamboo coral in Asia, if I remember right, and then dye it to look more like the exotic red coral which can be found in the sea south of France.
The red coral is actually an endangered specie there, due to the facts that it have been harvested too much over the centuries for its beauty.
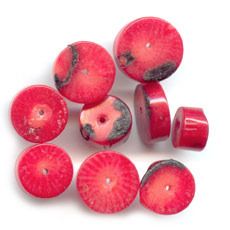
Bamboo Coral Rondelles from Perles&Co.
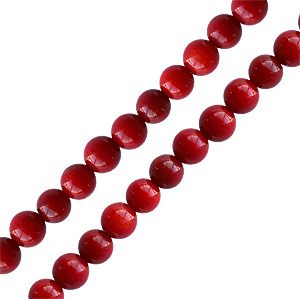
4mm round Bamboo Coral beads from I-BEADS.
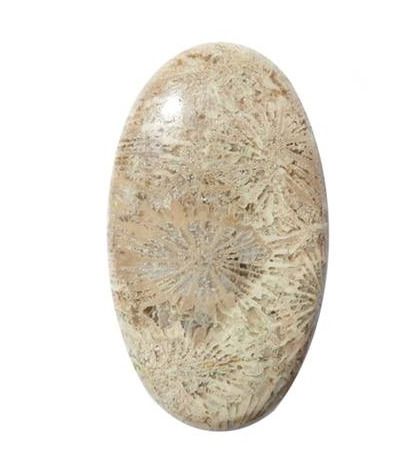
Fossilised Coral Cabochon from Kernowcraft.
Pink Coral Chip Beads from Kernowcraft.
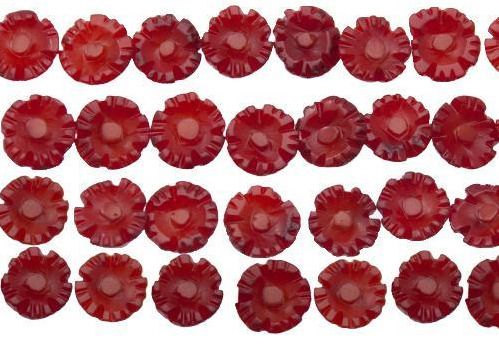
Red Bamboo Coral Carved 8mm Flowers from HobbyPerline.com

Related Posts Plugin for WordPress, Blogger...