Perlesandco 468x60

Saturday, December 29, 2012

Happy New Year!

The old year is almost over, and a new year is going to begin. I wanted to share this small video, a sum up on most of the creations I did during the summer to winter period this year.


I wish everyone a Happy New Year and a wonderful and fantastic beginning of the New Year!

Thursday, December 27, 2012

Bead Embroidered Brooch

One more week and this year is at an end. I wanted to share this one little last christmas present I created for my mother-in-law.
It's a brooch made with bead embroidery. I haven't really made many brooches at all, this is the second one, the first one was that little rose I posted a couple of weeks ago.

The brooch was born in the simple way of "improvising", heh. What I did was that I dug through the small collection I have of assorted gemstone cabochons, and I ended up finding three really nice ones that looked good together. They were white and had a little bit of a mossy green (no idea if they are moss agates or not though, heh) color spread out here and there on them, and I actually liked the color combination so I decided to use the palette; white, olive green and amber as beads for the brooch.

At first I actually had a silhouette that I decided on in the beginning, BUT. As I bezelled the cabochons I just ended up putting beads in places and shapes that I saw fitting, so I ended up with something more abstract in the end anyway.

My mother-in-law liked it a lotm which made me very, very happeh :3

Friday, December 21, 2012

Necklace: Marie Antoinette

It's Done!!!!

Managed to finally finish up my necklace, inspired by Marie Antoinette yesterday :)

I must say it's been an interesting journey, completing this piece. I think I started on it sometime around June/July. I had this brass cuff collar that I bought some time ago from "Robin's Beads" and I wanted to make something on a scale that I've never done before. In short I wanted to make a big two piece necklace, with a piece that would be attached to the collar.
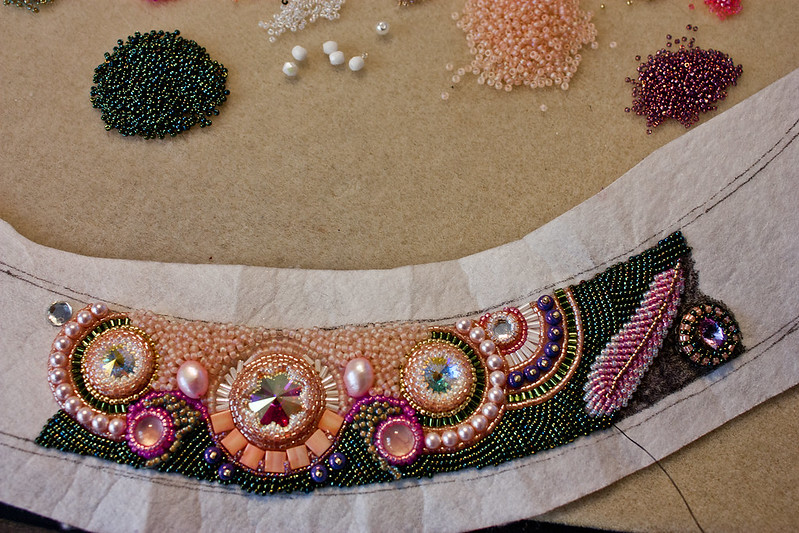
I decided to begin my journey with focusing on the part that would be attached to the collar, and cause of the inspiration, I wanted to make a baroque inspired silhouette for it. The main colors I had in mind from the very beginning were mainly pink and peach in different shades. After doing the bezels for the cabochons I already had glued down, I ended up with an artist's block, so I felt that I had to put it away for some time.

I took it out again when the inspiration sprouted out again, and this time I actually decided to add some more colors to give the piece a lot more contrast; moss green iris, lavender and amethyst with gold luster beads.
I ended up finishing this piece in a couple of weeks after working on it. I actually posted the w.i.p photo's on my facebook page as I went a long, and they are still there for those who are interested in having a peek :)

I actually had a living hell making a template for the collar, lol! No, really. It's so big and wide and already shaped so I kinda had to use sticky tape, double fold it and attach it onto the collar and carefully press it down on a paper AND THEN draw around the edges of it onto the paper.
The biggest sample of Lacy's Stiff Stuff actually isn't big enough for this collar model, so I had to improvise. After I drew out the shape from my newly made template onto the beading foundation I took another piece of foundation and angled it next to the other one. I added some E6000 to the edges of each one of the two foundations and pressed them together, and I smoothed out the glue over the area of where two pieces met to make it extra secure.
My experiment actually worked and after the glue had dried the two pieces ended up together as if they'd always been there.

 I took a small break at this point, before starting to work on the collar. I wanted to make some Christmas presents to send up to some special ones, home in Sweden, making sure that they would have them on time before the 24th (we celebrate Chrsitmas EVE in Scandinavia, not Christmas Day like most other countries do, heh), and they received their gifties last week :)

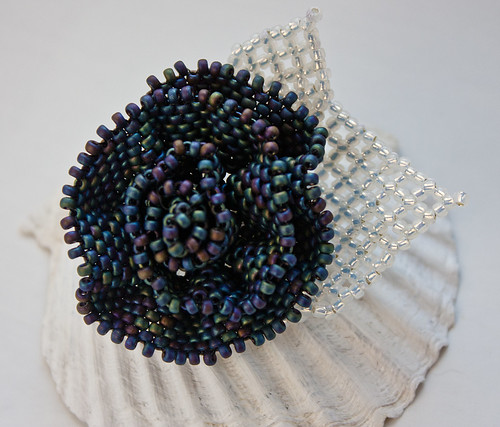
When I started on the collar, I knew I wanted something sparkly and not too many details, as the other part has a lot of details. I incorporated a couple Swarovski rivolies as the focal point for it, and then I began to pretty much work from there. The design of it evolved as I worked on it. At some point however, I decided to also add a smaller feather on each side of the collar that would match up with the big feather I created on the first piece.

After finishing the collar, gluing it onto the brass piece and edging it with brick stitch I went back again to the first piece to create a fringe. One of the things I personally find hard to create is a really good fringe, lol. I find myself sometimes in a bit of a problem when doing this, depending on how the bottom shape of whatever I'm fringing looks like.
In the end I managed to come up with something awesome. I wanted something more irregular, so I chose what kind of beads I wanted to add and how; freshwater pearl, swarovski bicone crystal, 4mm firpolished bead and 3mm firpolished bead. Going from there I decided to add some 11/0 seed beads in the rose tea AB colored beads, and when I would turn up again to secure the fringe I worked peyote stitch on the seed beads laying in between those focal beads I mentioned earlier.

When the fringe was completed, it was time to finish the whole piece. After some comparing I ended up attaching the pieces with two 11/0 seed beads and an 8mm south sea shell pearl in between them.

I'm probably not gonna post another blog update before Christmas, I'm not sure :) 
But in case...
I wish you all a wonderful Christmas  

Friday, December 7, 2012

Marie Antoinette Update V

Thought I would share another update of my Marie Antoinette piece.
I've been working on it all week, and the collar part is almost done :)

I want to keep the collar pretty symmetrical since the other part of the necklace is pretty abstract. I planned on making both sides pretty much the same though :p

If you wish to see even more picture of the process, they can all be accessed on either my personal FB or on my FB page.

Thursday, November 29, 2012

Spike Earrings

A few months ago I purchased a couple of spike beads in different sizes and colors, just in case I would come up with something to do with 'em. And lets face it, I just love a bit of dangerous looking pieces, especially with spikes, lol.
I've been planning on incorporating them in various bead embroidery projects, I've just put it on ice for now until the bead embroidery piece I'm working on now is finished.
This afternoon, I decided that I wanted to play around and experiment, and possible come up with my own, very simple pattern using spike beads.
I took notes as I moved on and found a style that I liked. I also decided to make a second pair of earrings using the same pattern, just different colors, heh.

I'm not sure if I'm gonna release the pattern, or just keep it to myself, or on whatever platform I would release it on, we'll see :)

Wednesday, November 28, 2012

BTW - 28th of November 2012

I have been a little bit occupied these two weeks, where I haven't ended up making a single post since the last one.
The holidays are getting even closer, and I'm starting to feel it even, for each day that passes by.
I haven't been beading too much, if I should be honest. I suppose I ended up with one of those annoying creative blocks :)
I also ran out of two bead colors, which are essential for my "Marie Antoinette" necklace. I had to put that one aside until they would arrive in the mail, which they did yesterday :D

beadedflowersma- 012
Well, while I've been waiting for those beads to arrive, I've actually been playing around with some bead stitches and flower patterns - reading "The Beaded Garden" by Diane Fitzgerald, to get some basics back into my head.
Short story; I ended up trying her way of creating beaded roses, and it went better then I expected. After mastering it, instead of just leaving the finished flower, I decided to create a little brooch of it. And I ended up adding two netted leaves to accompany the rose.
I actually had so fun experimenting with different sizes on the netted leaves, I ended up making a pair of earrings with two of 'em.

beadedflowersma- 015
I haven't been posting any updates lately on my "Marie Antoinette" necklace, I apologize for that, and here's a picture of how far I am on it now :)


beadedflowersma- 007

Thursday, November 15, 2012

Necklace: Frost Heart

Yesterday, I managed to finish up a necklace I've been working on. The necklace is a Christmas present for someone.
I decided to take a break from my Marie Antoinette piece and do this one. Well, I ran out of a bead color I need for that piece anyway, so why not take a break until I have them back in my stash again? :)

What inspired me to create this little heart-shaped pendant is actually the cat's eye tear drop cabochon in the center. I love that cab so much, and I actually got it in my collection by pure luck, from one of those cabochon mixes. I've looked, and the store I bought the mix from doesn't sell exactly this tear drop shape separately at all. I was just lucky to get it, heh.

I laid the cabochon onto my sketch book and began to doodle, until I had the heart shape.
When it comes to choosing colors, I ended up just with white for beads, but with different surface treatments on the beads (pearly, aurora borealis etc.). I thought that white would really compliment the cold blue color of the cabochon in a perfect way.

For once, I also decided to add the clasp starting from the pendant itself. I thought it would be a nice change to do something a little different.
As for the chain, I ended up doing a thinner chain with spiral stitch, using 11/0's as the core bead and 15/0's for the spiral. To add some dimension to the chain, I incorporated a quartz crystal bead in random places in the chain as I went a long creating it.

Thursday, November 1, 2012

Bead Embroidered Cross Pendant

I got a "hint" some time ago from my cousin that he wanted pendant with a cross, and now, with Christmas getting closer, I decided to respond to his hint.

Of the fact that this is for a male, I also had to go back and think out of my feminine box and try to work it as masculine - or Unisex as possible.
I think I managed to create a pretty unisex piece though, the more I stare at it, the more I actually notice that it doesn't really yell any specific gender around the pendant.

I wanted to add something extra, and just not bead embroidered a "bead-painted" cross, so I decided to add a little 8mm Black Onyx cabochon to give the piece some soul, heh.
The colors I chose for this piece where kinda dark, as I wanted the cross itself to be in gunmetal, I decided that a black background would enhance the shiny gunmetal beads, which makes out the shape of the cross even more when the light hits it. However, just a black and "grey" piece would be a tad bit boring, so I decided to add a row around the first rows around the cab, with gold metal iris beads, and I personally like it :P

It wasn't that hard to pick out a chain, as I had a piece left of gunmetal plated chain from previous projects. I didn't want to make it complicated and add a clasp, so I just made it about 60 cm and attached both ends of the chain together, so it can easily be slid on and off the neck.

Thursday, October 25, 2012

Necklace: Shades of Blue

Yesterday i posted an undergoing project I was working on since yesterday, which I planned on making  a Christmas present for someone.

Well.. It's all done now and I managed to get a nice photo of it earlier today as well :)

The process I went through to create this piece is that I made the pendant first. I simply added a stop bead just before the first 8/0, before the Swarovski bicone, and then I added the following after the bicone: 8/0, lampwork bead, 8/0, 10mm bicone and another 8/0 seed bead. From there I began to play out a coral fringe in a lighter blue and a darker teal blue in 15/0's. For where I turn back the fringe, I used 1.8mm Miyuki cube beads and 15/0 galvanized silver seed beads in a permanent finish by Toho.

When the pendant was done, I used a Beadalon beadingwire to attach the core beads of what was going to be a spiral rope. Measured out an even number on each side (added the pendant in-between, in the very center). Then I began to work my way on my speedy spiral rope technique :3

Wednesday, October 24, 2012

BTW - 24th of October 2012

It's been quite some time since I posted a bead table, and I thought it would be time to do so once again.
As you probably know by now, I'm working on a Marie Antoinette inspired necklace since a while now. The first part of the necklace is done, and the last bit I still have to start with ( I know how I want it already).

I decided to pop on a little break and start something smaller and I've been having in mind to create a blue necklace for someone for Christmas. Not gonna say whom, since the person reads my blog once in a while, heh :P

Anyway, on the picture you can see what I've done so far. I've started on the pendant, which consists of two 10mm Swarovski bicones and a lampwork bead. I'm currently adding a coral fringe for this (15/0's and 1.8mm Miyuki cubes).
When that is done I've planned on attaching it to a spiral chain to give it a little bit of "puffy-ness". I might add the magatamas you can see a little bit of in the upper left corner in the photo, but we'll see. It all depends on how it will look with them, and without them.

Tuesday, October 23, 2012

Marie Antoinette Update IV

Another update on my work in progress :)

The first part is pretty much done. It's done before I'm gonna add a fringe, anyway. The fringe will be added later when I can connect both parts together.
I'm gonna start on the final part of the necklace as soon as I'm done with a Christmas present I'm creating for someone.


Saturday, October 20, 2012

Marie Antoinette Update III

Another update just before I finish up the last area of this piece and give it backing and edging :)

What I did is that I decided to include more darker colors to go with the pink/peach, to give the piece a lot of contrast. I'm especially in-love with the dark green iris seed beads which I used to fill up a lot of the empty spaces.
I'll probably post an update when I've given the piece an edging. After that I'm gonna immediately begin on the collar part. What I've planned so far with that is that I want to incorporate a couple of Swarovski rivolis as focal, but keep the colors settled. I'll see if I break my planning of colors in this piece, everything depends on how it looks in front of me when I'm working it :)

Thursday, October 18, 2012

Wire-Wrapped Pendants

Yesterday I played around with wire again and I created two pendants, using wire-wrapping. I did some research before I went out to try to create a bezel for a cabochon from wire, just to make sure exactly how I could execute it.

My first pendant is created after a project from the book "Wire Jewelry Masterclass" by Abby Hook, and it features a spiral-like bezel. I used a gemstone cabochon from my collection, but I have no idea what sort of gemstone it is, lol.


For my second pendant I looked up some basic techniques on the internet to see how to make a basic wire-wrapped bezel, and I found one that was really handy, which I decided to use for references. I only have round wire in my stash, and the tutorial recommended half-round, which I understand would make the whole wrapping a lot easier for something like this. The round wire really made me work, as it didn't want to stay in place too often, lol, ah well, at least it's completed :P
Also, the cabochon is a Rock Crystal and the gemstone chip beads are Labradorites.

Last week I also invested in some "Gel Patina liver of sulfer", since I've been wanting to do some patina on my wire projects. And on this second pendant I had a bit of fun and made the copper go completely black, heh. Then I polished and buffed it on various places to give it more contrast.
I need to add a "fun" factor about the Gel Patina; it smells like rotten eggs, lol.

Wednesday, October 17, 2012

Hand-Mirror: Ella

Last week I made a smaller purchase of beads and some order supplies, and I decided to add an embellish-able hand-mirror since I got the idea when I saw it, to create something with Bead Embroidery for it (I confess, I ordered another one which hasn't arrived yet :d).
This is also the very first time I try to use Ultrasuede as foundation. The color I had laying around is a thinner one, and I don't think I'll ever use it for foundation again, as for me, it was very hard to work with. I still prefer Lacy's, heh.
The focal cabochon that I decided to use for this project is a handmade glass cab (not by me :) ), there after I used a Czech glass leaf bead, 6/0 seed beads by Preciosa and 15/0 seed beads in two different colors.

Saturday, October 13, 2012

Marie Antoinette Update II

So, yeah, I've been having a moment when it comes to this piece I've posted one or two months ago. I was suddenly so uninspired I decided to put it away for a little while until I would feel the inspiration for it build up. And yeh, a lot have happened now since I posted the last photo of it.
Sorry for the bad flash, it's been raining whole week and I don't get much proper photo daylight at the moment.
So far I'm just focusing on this first piece of the necklace I planned back then, and I haven't done anything on the collar part yet.
Also, I broke with my own plan on only incorporating red/pink/peach shades into the necklace and I decided to add other colors which I just love together with the previous shades I had.

Thursday, October 11, 2012

Cubic Right Angle Weave Rope

I've been having in mind for quite some time to try to create a cubic right angle weave rope following the instructions Nancy Dale provides in a free tutorial she wrote on her blog. The specific post can be located here. I highly recommend anyone, who haven't already, to read it :)

This project was actually really fun to play with. Especially creating the bead-soup! I chose a couple of colors that I really thought looked well together, then I added some more in different sizes and shapes of beads. I basically used 15/0's, 11/0's, 8/0's, 6/0's, triangles, hex cut beads, 3mm firepolished Czech glass beads, 8mm firepolished Czech glass beads, 4mm Swarovski bicones, tear drop beads, blue goldstone chips and dyed freshwater pearls.
The rope I created is about 80cm (31.5") and only goes one time around the head, but can be knotted etc. as I discovered when I was playing around with it :P

Thursday, October 4, 2012

Bead Embroidered Hair Clips

I got the inspiration to create these pieces when I was browsing through some beading blog on the internet (Sorry to say, but I can't recall which ones :\ ).
Basically the idea was to incorporate Tila beads, and use them as the focal point of the design.
As I have only a few different colors of Tilas laying around, I started to doodle a design, which would look structured, yet not too complicated. The hair clips I chose are the smaller size (I don't know the measurements out of my head :d ).
To begin, I picked out the tila color I wanted to work with and then chose some complementing colors in other beads and bead sizes. First thing I did was to stitch on the exact amount of tilas that I measured would be needed for what I was going to make, and then after I lined them up I added a row of Miyuki 1.8mm cube beads, which filled up the line nicely. Then I added a new row of 3mm bugles and 15/0, and then the final last row of 15/0's as well. After I cut out the completed piece I attached it directly onto the ultrasuede backing, THEN I (after the glue had dried) glued on the hair clip. After the hair clip had settled with the glue, I began to overlap the pieces of the hair clip with some smaller scraps of ultrasuede to give it a finishing touch.

So, why didn't I glue on the hair clip before attaching the backing?
Believe me, I really wanted to and tried. The problem I had was to measure out exactly where I would have to cut out holes and how big they had to be... It was just too much unnecessary headache which I wanted to go around.
All in all, I'm actually really happy with the result, and I was so happy with the first hair clip (the green with gold) that I decided to create another one, but with different colors.

Wire-Wrapped Ring in Copper

So I've been playing around with the latest batch of copper wire I bought last week, experimenting and trying some smaller projects from a book I also bought on that subject.
I noticed that I still had some larger (approx. 8-9mm) faux turquoise beads which I've had in my stash for ages, without knowing what I should do with 'em.

Well, I figured that I could use them to create a wire-wrapped ring with free-form. In other words; "Make the base and then see how the rest of the design could end up", since I don't sketch that often, heh.
Personally, I like the end result of it, for being my very first, own designed ring when it comes to wire-wrapping, lol.
I basically only used two different gauges to create this ring; 20 and 28. To get the right size of the ring, of course I used a ring mandrel. Also, what I did to make the ring band solid and compact, after I wire-wrapped the base with the 28 gauge wire, and finished it as I wanted, I again put it onto the ring mandrel and used a hard-rubber hammer and hammered the ring-band very intensively, all around. When you learn wire-wrapping you also get the knowledge that the more you work your wire, the harder it gets, so yeah, my band is very, very hard :).
 The rest of the design is pretty much free-form. What I did with one end of the wire is that I created a hollow leaf shape, which I then hammered flat and then polished. The swirls are just an experiment; I was so happy when my new round-nose pliers arrived that I put it to some action, lol, and that is the result :P

Saturday, September 22, 2012

Various Completed Projects

So, yes, I'm aware of the facts that I haven't been blogging much since I came back from the vacation :)

However, I've still been doing some stuff that I'm going to share with you in this post. I completed a bead embroidery pendant, which I started off just before I went on vacation. And for those who follow me on facebook and twitter, I mentioned that I finally bought myself a metal block and a chasing and a rubber hammer. And yes, of course, I've been doodling around with some wire; copper as I find precious metals are very expensive, and even more expensive to practice on.
As I went on and playeed with wire wrapping once again, I remember even why I haven't done it much to begin with; my nail are very soft (really soft, like jelly "almost") and the wire really manage to give them quite a beating, heh.

Here's the bead embroidery pendant I mentioned earlier. For the bezel I used 11/0 delicas and 15/0 Miyuki seed beads. The cabochon with the skull I actually painted and varnished; it was just black and white from the beginning, but I wanted a bit of  a personal touch to it so I painted the skull red and added some golden highlights on it on various places. I used a 14mm Swarovski rivoli to enhance the look of the piece a little more. At the bottom part there's an 8mm black onyx gemstone cab which is surounded bu 11/0 delicas and 11/0 seed beads by Matsuno, along with blue goldstone chip beads. The fringe I wanted a bit simpler then the rest; for the bottom I simply used some 11/0 seed beads in black and red together with 9mm twisted bugles, 4mm Swarovski bicones and small magatamas. For the sides I embellished with some long magatamas, to get a bit of a "tribal" feel to the piece.

When I played around with wire, I wanted to make something rather simple and basic. So I found this small project in the book "Bead & Wire Art Jewelry" that I wanted to try out now when I actually had access to a bigger selection of wire gauge then I had when I first bought this book, last year.
This project required 20 and 18 gauge wires.

This is another wire project. I saw this tutorial on the YouTube channel of Beadaholique, and I just wanted to give it a try to practice some wire working.
 This is my own design. I wanted to make something a little bit more abstract, yet not too complicated. First off, I drew the design I wanted in my sketch book where I have most of the designs I've made that aren't free-form. First I measured how much wire I would need, and then I hammered the frame flat, and used the ball side of the chasing hammer to give it some texture. I then began to join the loose parts I wanted around the main frame with some random wire-wrapping techniques (yes, I know; it looks really amateurish - only one way to learn; practice, heh). For the web, I used turquoise chip beads and 11/0 Toho seed beads in a permanent finish. 
 Oh yes, I've also been playing around with some kumihimo!
I've been wanting to play around and incorporate beads into my kumihimo for some time now, and I got my hands out of the pockets and actually did this one. I used both long magatamas and the smaller ones, to embellish the rope a bit here and there. The reason to why I didn't do a complete surrounding of beads is that I didn't have enough of the magatamas in the colors I chose to work with. Still, I personally like it. Main thing, right? lol ^^

Do you also have a lot of balls in the air at the same time?
Related Posts Plugin for WordPress, Blogger...