So yeah, I've wanted to make a tutorial over the Russian Spiral stitch for a little while, since it's also one of the chain stitches I've been using the most. And I would like to share how I make it, although it prolly doesn't differ that much from how others are making it, but I thought I would share since I'm in a writing mood as well lol.
I also doodled up a diagram that shows how the pattern is worked out, if the photo's aren't clear enough. The diagram can be found at the bottom of this post.
Mainly you use two different sizes of beads. On this photo I chose to work with two sizes of beads, but three different colors; bottom-left 11/0, center and right are 9/0 seed beads.
You begin with stringing on beads in the following order: one 9/0, two 11/0, one 9/0, two 11/0, one 9/0 and another two 11/0.
Next, you can either chose to pass your needle through the beads again to form a circle, or just by tying the tail of the thread together with the other end to form a circle; this is the way I personally prefer to do it, and I tie it with a surgeon's knot since then I can be sure that it will sit on place.
After you tied the thread, or passed it through, make sure your thread is coming out of the very first 11/0 seed bead that comes after the 9/0 seed bead.
Also, to make things easier to work with, since we're working on a circular stitch, you can add your work around an object, like a pen, stick or whatever. I use my crochet needles for this, since they are so small, but yeh, a braiding needle works as well of course ;)
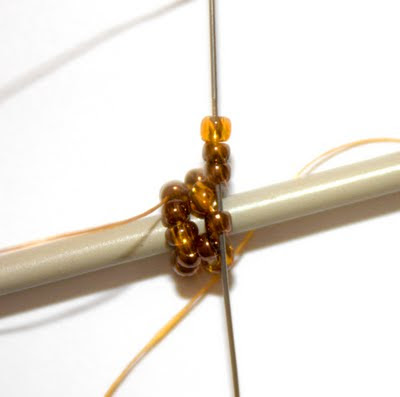
Now, begin with picking up one 9/0 and two 11/0's
Then pass your needle through the next 11/0 seed beads that is behind the 9/0 seed bead. So, you should skip one 11/0 and one 9/0 before you pass your needle through the 11/0.
And when you finally reach the last 3rd part of the first row go through the 11/0 that is now between the 9/0 in the base circle and the 9/0 in the first row.
Now you continue to pick up the same amount of beads in the same order we have used before, and you pass your needle through the 11/0 that is placed after the very first 9/0 in the first row.
Now you can continue to work your way like before until you get the desired length you want.
As I mentioned in the beginning of this post, here is the diagram I sketched up.
TIPS: You can use a lot of different types of designs and beads when it comes to the Russian spiral. You can for example decrease the amount of beads, depending if you want something thick, or something a lot smaller then what I just showed you. Instead of three core beads (the bigger)you can use two, and then four smaller beads.
If you want something looser you can use a lot more then only two smaller beads, and you can ever increase and decrease the amount of them over time to achieve a cooler effect.
You can also change the core beads into bugle beads to get a DNA kinda look in your piece, or just simply switch 'em out for something completely different.


No comments:
Post a Comment