Perlesandco 468x60

Monday, August 29, 2011

Necklace: Queen Elizabeth

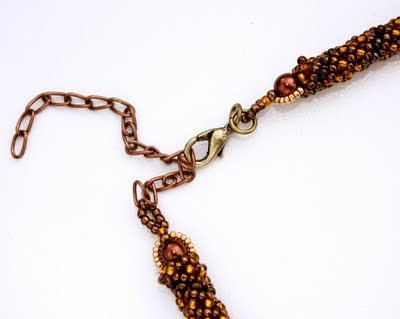
So I got another commission to make a Russian Spiral necklace a few weeks ago, and I hadn't been able to begin making it since I've been having a lot of things going on at home etc.
Anyway, the only request I really had about this necklace is that the woman wanted something in yellow and brownish colors, so I decided on taking it a bit further, concerning the design itself.

Last month I filled up my stack of beads with some matsuno 11/0 seed beads in bronze since I've been wanting to stack up on that color since a while.
I used them for the smaller bead for the chain itself, and then I used 9/0 seed beads in two different colors; topaz lined silver and antique gold.


As I began making the chain, I came up with the idea of making just half the length of the chain in two part, followed by some netted beaded beads at each end, which would end up attached to each other, like a pendant. I used some 6mm fire polished czech glass beads and some 6mm bronze colored glass pearls to make 'em. And then at the bottom of each beaded bead I added a fringe.


I used a copper chain and a lobster-clasp in antique gold as an attachment.
Sorry about the name tho =P It kinda shouted "queen" to me in some weird way, lol.


Friday, August 26, 2011

Earrings: Cupcakes!

I were surfing around in DeviantArt the other day and came across this damn cute tutorial on how to make beaded cupcakes.
You can have a look at the tutorial and the rest of the gal's gallery by clicking here =)

As soon as I saw the tutorial I thought "hey, lets make some cute earrings", lol. Actually they are damn cute, and I'm not too much into beading sweeties or things that reminds of eatable stuff, but... Someday that "motto" ends up getting broken anyhow XD


Since I had a couple of 3mm bugle beads (the tutorial calls for 3mm) laying around in different color mixes, I decided on using those since I weren't even sure I were gonna use 'em in any bigger projects anyhow; You en up buying them shinies cause they are pretty not cause you think to 100% that you'll be needing it... That's with me anyhow. Dunno if other people are planning THAT much ahead.


Anyway!
I ended up making two pair in different color themes. Each cupcake goes really easy and fast, and the tutorial describes perfectly what and how you should do everything, and after I made my first cupcake I was fine to do the others without having to look back at the tutorial again.
The cupcake mainly is made by using square stitch, and daisy (for the round bead).

Saturday, August 20, 2011

Tutorial: Dead Princess

Okey, so I decided on showing how I made the "Dead Princess" pieces that I posted earlier. This is also the very first time I've made a tutorial so I hope that everything will be understandable enough.
But I'll try my best ^^

And I do apologize for any grammar mistake or if I repeat myself a few times :)

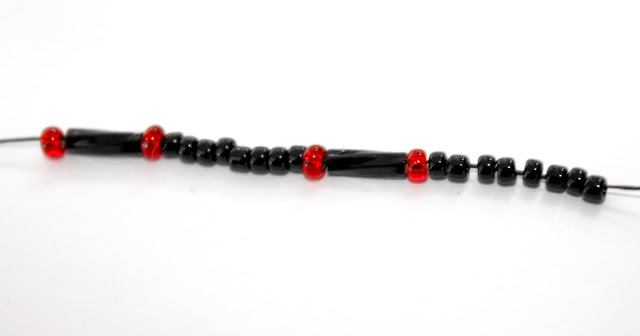
To make it, it used 11/0 seed beads (black) and some 7mm twisted bugle beads but 6mm bugles should work as well. I also used some 9/0 seed beads (red lined silver).

As normally, start by picking a needle and thread. I used a size 12 needle and Nymo thread in size D. The reason to why I chose such a thin needle is cause you're going to pass through the beads quite a few times, but I would say that a size 10 also should work, up to you.
And the reason to why I chose a thicker thread is cause the bugle beads have a tendency to shred the thread and cut the whole thing, and yeh... then we'll have a ruined piece. And since you pass through the beads a couple of times, as I mentioned before, you will decrease the chance that that will happen.

 Begin with picking up 1 9/0, 1 bugle and another 9/0.
 Pick then up 8 11/0 seed beads.
 And then again, pick up 1 9/0, 1 bugle, 1 9/0 and 8 11/0's.
 This is how your line up of beads should look like.
Slide them down to "almost" the end of the thread, leaving a comfortable length of tail behind.


Then go through all the beads with your needle and thread through the opposite side .


Pull tightly at the thread where your needle is attached and the tail.
At this point you can chose to either leave the tail loose or just tie the thread together in a knot. A simple over-hand knot or a surgeon's knot.


 Personally I prefer the surgeon's knot, cause then I know that it will sit there


From there you'll go through the 8 11/0 seed beads with your needle and thread.


Then you also go through the two 9/0's and the bugle. Now this is the pattern; you should always end your unit by coming out from the two 9/0's and the bugle, either from the top or from the bottom.
 So now we're moving on to the second unit in our piece. Since we're coming out of the part with the bugle bead, we don't have to thread those beads on again.
Begin the second unit by picking up 8 11/0's, 1 9/0, 1 bugle, 1 9/0 and another 8 11/0's.


And like every other right angle weave we sew our needle through the opposite side of where we came out, but through those same beads.


Pull your thread tightly so the beads are lining up in a square.
 Then go through the next 8 11/0 seed beads.


And then through the 9/0's and the bugle, so you yet again finish the unit by  having the thread ending through the part with the bugle bead.


Keep repeating these steps until you have the desired length as you want.

Now we're going to begin the second row. Remember; your thread should always end at the part with the bugle bead. So after that you begin by sewing through 6 or the 11/0 seed beads next to where your thread is coming out.
This time; pick up 2 11/0's, 1 9/0, 1 bugle, 1 9/0, 8 11/0's, 1 9/0, 1 bugle, 1 9/0 and another 2 11/0's.
This is where we're going to make that little diamond shape in-between the units. Go back all the way to the beginning of the 8 11/0's that are on the unit you're working with. Then skip the two first, and then go through the four 11/0's - going out of the bead where your thread is coming out.


Pull your thread tightly to for the unit.


 Now, go through the two 11/0's and the 9/0's and the bugle bead, ending this unit.

Now we're going to begin our second unit in the second row. And like the first row, make sure your thread is ending out of a 9/0 from the part with the bugle bead.

Since we already have two parts of the unit complete, we're going to pick up a different amount of beads.
Begin by picking up 8 11/0's, 1 9/0, 1 bugle, 1 9/0 and 2 11/0's.

 Now we're coming to the part that is a little bit different then in the first row.
You begin by passing your needle through the four 11/0's in the middle of the second unit in the first row.

 Pull your thread tightly, then pick up 2 11/0's and pass your needle through the 9/0's and the bugle beads and pull tightly.

 Then pass your needle through the 8 11/0's and the 9/0's with the bugle bead in the second unit and pull tightly.
 From here on you work the rows on. But since your thread is coming out of the bottom of the 9/0's with the bugle, you just pick up the beads and weave in the opposite way of what I just showed you; 2 11/0's, pass your needle through the four 11/0's in the middle of the second unit in the first row. Pick up another 2 11/0's followed by the two 9/0's and the bugle bead, then you pick up another 8 11/0 seed beads and pass your needle through the top of the 9/0's and the bugle of your second unit in the second row (the opposite way of where your thread originally came out from).

Repeat these simple steps until you have the desired length and thickness of what you want, whatever your making a necklace or a bracelet, or maybe even something else :)


 I also decided that I might share on how I added the little diamond in between the 9/0's and the bugle at the end of the pieces. This part is where I added the attachment of pearls and little toggles.
 Begin by passing your needle through the beads so that you finally manage to get out of the part with the two 9/0's and the bugle bead. Here are some mathematics involved, if you're like me and want to pass through the bead in the same order as you put the units in.

Now you simply pick up five 11/0's and pass your needle through the 9/0's and the bugle bead that are just above the ones you came out of.

And there you have it!

Choker: Dead Princess

Managed to get the choker that I began making since I finished up the cuff I made in the beginning of the week.


I used the same RAW stitch and beads to make the base, and then I made a little fringe using some drop beads in two different sizes.


 I also decided on making a tutorial on how I made this piece. Haven't made a tutorial before so we'll see, lol.

Wednesday, August 17, 2011

Bracelet: Dead Princess

I sat yesterday evening and played around with RAW stitch and some 7mm spiral bugle beads that I received as a gift last week from my mother-in-law.
I decided on making a little beaded cuff with the bugles and with some black 11/0 seed beads. I wanted at least another color in it, so figured that I actually for once would combine my absolute two favorite colors (together); red and black. I had some 9/0 seed beads in red lined silver hanging around since a while and hadn't figure out what to do with 'em... Until now!

I decided to combine 'em in a pattern following the bugles in the square and voila!

Then I snatches some cute butterfly and flower beads that I had laying around in the assorted red bead mix that I've been having since... A while anyway.
I embellished the cuff with a couple of those here and there in the center of the cuff. And then I added three 6mm fire polished glass beads in red, for the closing.

The cuff sits really nice and tightly around the wrist and I managed to get exactly what I desired with making this piece. And I've also planned on making a choker using the same technique and design.

Monday, August 15, 2011

Necklace: Thorn

I spent about the last 3-4 days working on a necklace with an opera length since I've been wanting to do one for a while, using beadweaving. I made one before, but using wire and chain, so I thought I would get a little bit of variation making this one.

I used simple spiral stitch to make it, which I haven't used for quite some time, since I made a bracelet. To be honest the spiral stitch isn't really one of my favorite stitches to work with. Why? Cause you always have to keep the thread tight as you work your way through it, specially if you're like me and using nymo. I know that FireLine should keep it a bit more tense.

I actually made this spiral a bit more different then the ordinary tho. Instead of threading on the core beads at the same time as the outer beads I decided to string them on at the start, to also get the desired length as I wanted, and then I worked out the spiral.
I used 11/0 and 15/0 seed beads, and I also added some size 11/0 Thoho triangle beads to give it, should I say, A LOT of contrast?! Actually I like it that way, and it looks really nice in gunmetal, and the surface of the beads are so shiny it reflects the light in all directions.

The fun thing I find about the opera length of necklaces is that you can wrap it around your wrist and change it into a bracelet. The one I made be wrapped five times around the wrist, and it looks really cool only on there :)

Thursday, August 4, 2011

August Moodboard

Whoo hoo!

I finished up the piece I wanted to make for this month's moodboard challenge by Operation Tackle That Bead Stash!. Finally I manage to finish it up early since my piece for July was a bit slow. I never managed to get time for finish it up; most of my time goes to the kittens at the moment.

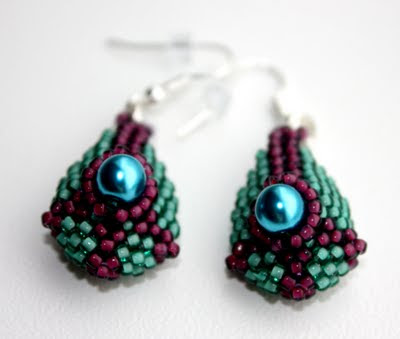
Anyway. I really, really, REALLY liked the color scheme that she picked for August; green, purple and turquoise. I find the combination really original, and I actually had a couple of seed beads and some pearl laying around that would fit very nicely together.

I wanted to take my peyote sculpturing a bit further then to only making squares and triangles, so I had a look in the book Shaped Beadwork, written by Diane Fitzgerald, to get some tips and inspiration. One shaped I really wanted to try out was the tear drop shape, and so I created these two earrings, and then later a slightly bigger pendant in the same style.
I already decided before I finished the shapes that I wanted to use the 6mm glass pearls as an embellishment in the middle of the tear drop, and so I did =P

I added another 6mm pearl inside each one of the earrings to make 'em "bump" up and keep the 3D-like-shape. I added some soft plastic paper inside of the pendant to achieve the same effect.

Tuesday, August 2, 2011

Netted Beads and Beaded Bead

Had a lil' fun last night when I received my latest order of beads in the mail yesterday, a little gift I got from my mom.

In the weekend I've also worked on a little bracelet with 6mm and 4mm pearl, which I netted some 15/0 seed beads around.
Yesterday I wanted to do some more netting as well. I've been working on a bead-netted bracelet for about a week (lazy), using the technique they show in Creative Beading Vol. 5, from the Bead and Button Magazine. I wanted to experiment a bit with the stitch, and I've seen a lot for other beaders out there using different sizes of beads to make beaded beads or pendants. And since I had such a nice selection of round and fire polished beads from a topaz colored mix that I bought, I thought, hey lets use those!
And yah, it ended up kinda cute, heh =P

I also bought a couple of 12mm round wooden beads, simply cause I've been interested in making some beaded beads since a little while ago, and they do end up looking so cute (mostly).
For making the one I made I only used 15/0 seed beads in four different colors (alas, my stack of 15/0's are still very, very skinny compared to my collection of 11/0's).
Anyway, I worked my rows of circular peyote around the bead, increasing and finally decreasing. Was rather fun, and I might even try to work this out with 11/0's depends on when I get time to figure out how many seed beads I need per row compared to the 15/0's.

Related Posts Plugin for WordPress, Blogger...