Perlesandco 468x60
Showing posts with label necklace. Show all posts

Friday, June 20, 2014

"Child of Night" up on Ebay

I decided to take a leap of faith and put up the necklace "Child of Night" on Ebay yesterday.
If anyone is interested just follow this link -> http://www.benl.ebay.be/itm/231263013567?ssPageName=STRK:MESELX:IT&_trksid=p3984.m1558.l2649 :)

Thursday, March 13, 2014

Bead Embroidery Fractal Necklace II

So, yeap! I made another necklace using two of the fractal cabochons I created a couple of weeks ago. I decided to use two, since well, they are the same fractal I just decided to render them with different color scheme when I created them in Apophysis.
The fractals are placed against a black background so I decided to stick to black pretty much throughout when it came to my bead choices. I just decided to use some similar colored beads here and there + the fringe to give it a little extra something.

When it came to the fringe, I didn't want something too basic, so I decided to make a few strips in peyote, herringbone, spiral stitch and raw. It was fun doing the fringe like that as I could just play around with each one of the shapes in the fringe one at a time until I got something I ended up liking.


Monday, August 19, 2013

Polymer Clay Cabochons & Necklaces

Okey, so I've been taking some interests to those fabulous polymer clay cabochons with flower motives that I've been seen going around the web, and being used in different types of jewelry and accessories.
I've been curious on how to make my own, and when I did some research about them I've noticed that they're either called filigree or "embroidery". I would guess that they're called embroidery cause you pretty much use a basic needle tool that you work with clay to "attach" a small piece of clay into the clay base you want to attach them on...

So yes, I finally took some time and decided on making my own. As I did I also thought I would use the Premo Poly Clay instead of the FIMO, which I've always have been using so far. Darn! I love Premo, and I wish I had a lot more. I found the Premo in Perles & Co.'s webshop, as the reason to why I have a load of FIMO is cause that is the most common brand they carry in hobby stores over here.

I'm sharing a few pictures of what I've made in polymer clay way...

I've also used two of the ones I created so far. They ended up as pretty simple necklaces. I didn't want to make something too complicated, as I know that too much can distract from another pieces; in this case I wanted to put focus on the polymer clay cabs so I kept it pretty simple design wise.

Currently I'm also working on a little different project where I also ended up using one of the yellow/green gradient flower cabs I made and posted in this blog-post. But I'm not gonna post any preview piccies of it, so I'll just wait until it's completed :)

Saturday, July 6, 2013

Necklace: Siren's Song

Yesterday I managed to finish up my latest necklace piece and get a pretty decent photo of it...

I had been having a vision of a necklace with Turquoises a few months in my head before I actually started working on this piece. My dilemma was that I didn't really have many turquoises in my stash so if I wanted to create this piece I would have to have patience and wait till I could purchase them. One thing I learned when I did my purchase of a load of turquoises in both bead for and as cabochons is that they are one of the most expensive gemstones you can get your hands on - I already knew they were expensive before, but I learned that the polished stones are even more expensive then tumbled stone, hah.

I wanted to try something a little different when I created this necklace. Looking back at some of my previous designs I noticed that I've barely created any piece at all that contained a lot of stop stitch; when I've seen other bead artists creation I've noticed that the stop stitch provides a lot of texture to a piece and that is what I wanted to accomplish.

I also got my hands on some of those new Rizo beads and I wanted to try and see how they would look in bead embroidery if I would just basically stitch them down to the foundation. The result is pretty neat and it definitely created a whole new type of texture, almost like fish scales. Think I need to get my hands on some more of those and in different colors cause they really put me in the mood to experiment a  bit more with 'em.

I also spent some hours at creating myself a new logo I could put on my photos ones they are ready and approved by myself to be put out on the internet, heh. So yeah, I actually had some fun going back to PS to play around and doodle with different ideas and then put them together into something I felt could last for quite some time.
I created two different versions of the logo; the smaller version with less text and then a version that contains a bit more and is bigger.

Saturday, June 8, 2013

Necklace: Forest God

So yes, I've been a bit distant from blogging the last few weeks. Well, the basic reason is that I've had my mother over from Sweden for 15 days, so I haven't really been doing anything jewelry related as of late :)

However, the moment I got some spare time to work on one of those bigger pieces I decided to finish up everything on the "Forest God" necklace I've been working on. I don't think I've posted any "teaser" or w.i.p photos of it, so I suppose this is gonna be a bit of a "surprise".

I didn't really have any "main" plan in mind when I did this one. The thought I had when I began to doodle out the design was that I wanted to make something in green, a necklace preferably; the pantone color of the year 2013 being emerald and all, and since I've already done a bead embroidered cuff last year in that color I thought a necklace would be refreshing.
I had a few green focals in my stash that I wanted to use for this one, and the main one I wanted to include is the green dyed abalone in the very center. After I began to play around with the ones I had and created a template that would work and places out the different cabs on places where they would look good.

Okey...
After working on it I ended up seeing a freaking dragon's face in it, and I still cannot get that out of my mind when I stare at it, lol. I asked my mom for an opinion when she was here and she saw something completely different; a butterfly...
So I'll just leave it at that and let everyone decided for themselves what they see in it, if they see any odd-looking-shapes-or-faces :P

Finally I also managed to find a wonderful jewelry bust display that measures 35cm in height, waaaay bigger then what I had laying around. I think the biggest I have is about 20-25cm in height so those extra 10cm is like a blessing. I found it from a retailer at the German Amazon site, and yes I am very, very happy with it :)


Thursday, April 18, 2013

Bead Embroidered Necklace I

About two weeks ago I got a request from a friend of my bf's who asked me if I could make him a necklace that would be a gift for his gf.
I asked him a few questions to know what sort of basic directions I could base the design of. He told me a budget, and gave me the two basic colors purple and black. He also wanted me to incorporate the letter "E". It's the first letter of his name, he told me that he wanted the piece to remind her of him. Obviously he gave me pretty simple things to go after, I mean I could basically do whatever I wanted sticking to those guidelines he gave me.

The first thing I did was to find a few focals/cabochons that I could use for the necklace, then I placed them out in my sketchbook and began to doodle a basic silhouette. After a few minutes and experiments I ended up with the silhouette you can see on the photo of the finish product.
I thought that using only purple and black would be a bit flat so I decided add gold into the design as well, makes it a bit more "royal" I suppose.

As for the chain the pendant is attached to, I didn't want to be too complicated so I layed out a pretty basic design on my design board; a single strand of round Czech glass beads in sizes 8 and 4mm. I also used 11/0 seed beads and just before the long strand of 4mm round Czech glass beads starts I added a 6mm round blue sandstone bead on each side to make the fading of bead sizes look more smoothly towards the end.

Wednesday, April 3, 2013

March Challenge Piece for OTTBS!

Yep, I realize that this post is about three days late, I apologize for that ^^ Been a bit occupied here, been having a terrible cold for more then a week and it's finally starting to clear out of the system :)
For the March Challenge at "Operation Tackle That Bead Stash!" the theme was to use at least three different pastel colors and that extra twist was to incorporate leaves in the piece.
When I saw the theme of the challenge I wasn't really too keen to participate in it as I normally don't feel that drawn to pastels, but for some reason, four days before the deadline I suddenly felt very, very inspired to create something using this theme. I found a kind of a limeish colored gemstone cabochon in my gemstone cab collection (I have no idea what gemstone it is, but a few months ago I found a picture that showed a very similar gemstone, and it was called lemon-quartz; again no idea if that is correct *shrug*), that looked great together with some of the pale lavendelish colored beads I had in a tube.
I began with gluing the cabochon onto some foundation, then I played around with the bezel which I created in netting. After that I began to play around with the shape, and see what sort of beads looked good and how I would place them onto the foundation to make it look just as I wanted.

When I finished, just to that point when you look at what you're creating and you have that little creative voice in your head telling you that "this is just perfect". That voice that tells you to stop, I've noticed that if you sometimes don't listen to it you can end up over-designing whatever you were working :P
At this point I wasn't really sure what I was going to do with this piece; A pendant? A brooch? In the end I decided on a pendant. I wanted to keep the chain as simple as possible so I just used the basic colors I picked out from the beginning and went with it. The chain is created with the simple Russian spiral stitch, and I used 11/0 and 15/0 seed beads for it, to make it so thin as possible.
Working a Russian spiral stitch with 15/0 and 11/0's, I think! Took the double amount of time it takes when I would work with 8/0 and 11/0's or with 9/0 and 11/0's.

Friday, March 22, 2013

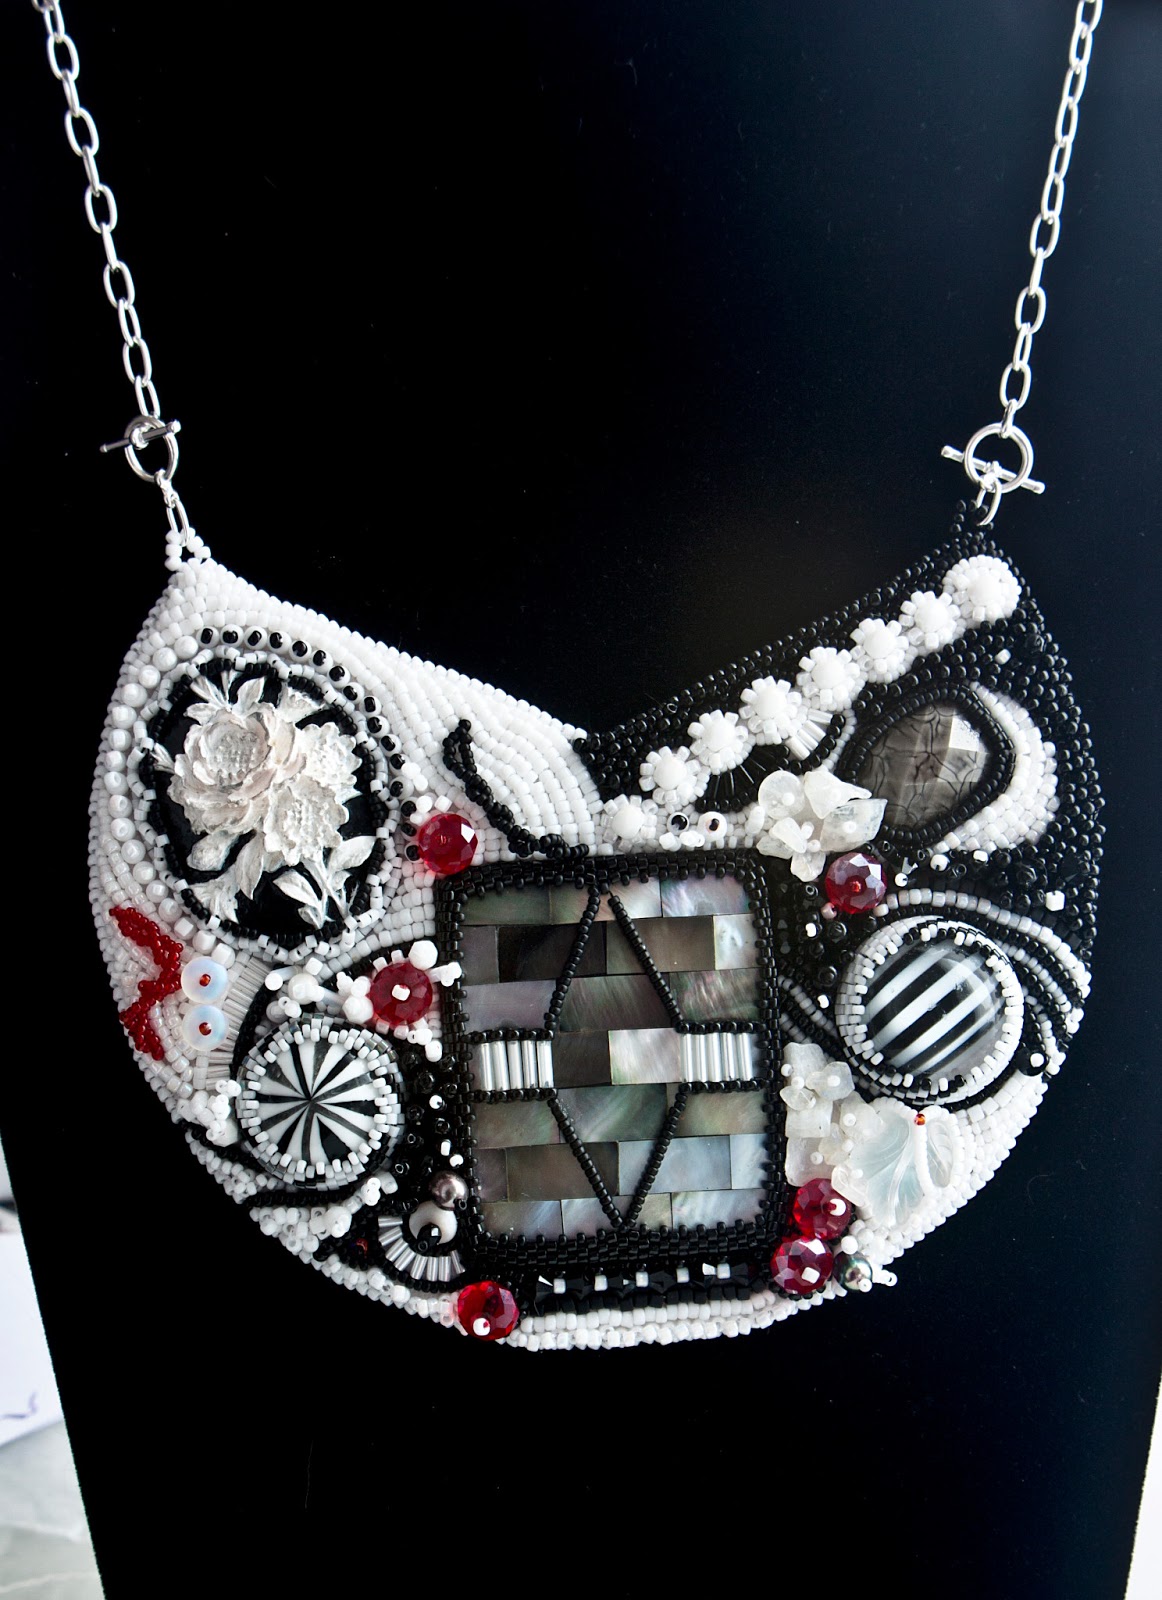
Bead Embroidery Necklace

Been some time now since I had time to blog last time, my apologies :)

A few days I managed to finish up another bead embroidery piece, but we've been having it really dark and gloomy, weather wise, and I prefer to take my photos using the daylight rather then a lamp etc. So yes, I've been waiting patiently for the weather to clear up a bit so I could get a somewhat decent shot of this necklace. I have to admit tho, that I really had a hard time getting great photos of this necklace, maybe cause it has a lot of black and white? *shrug*

The idea from the beginning when it comes to this piece came a bit random to me. I was cutting out the new template I made for another bead embroidery collar I'm working on, and one piece of paper which I cut out ended up with the exact silhouette as this necklace has. I liked the shape of it so I decided to take it to the next level and make a, yeah, as you can see... A necklace :P

I've been wanting, for some time now, to create a black and white piece and that was the idea I had in mind. But indeed, as I worked I ended up incorporating some greys and some faceted red roundel beads. When I was playing around with the red beads in various places I couldn't help myself but to incorporate them, cause they were really "screaming" at me.
I also, finally, got to use the patched up shell cabochon I bought last year from an Etsy seller in the US. The person has two separate shops and he/she sells almost the same stuff in each of the stores; Balibagus & Cabcabana, I strongly recommend for you to take a look, especially if you're interested in hand-cut gemstone cabochons and hand-carved bone, the selection is wonderful and the seller keeps updating with new products at least ones a week, if not more :)

Friday, December 21, 2012

Necklace: Marie Antoinette

It's Done!!!!

Managed to finally finish up my necklace, inspired by Marie Antoinette yesterday :)

I must say it's been an interesting journey, completing this piece. I think I started on it sometime around June/July. I had this brass cuff collar that I bought some time ago from "Robin's Beads" and I wanted to make something on a scale that I've never done before. In short I wanted to make a big two piece necklace, with a piece that would be attached to the collar.
I decided to begin my journey with focusing on the part that would be attached to the collar, and cause of the inspiration, I wanted to make a baroque inspired silhouette for it. The main colors I had in mind from the very beginning were mainly pink and peach in different shades. After doing the bezels for the cabochons I already had glued down, I ended up with an artist's block, so I felt that I had to put it away for some time.

I took it out again when the inspiration sprouted out again, and this time I actually decided to add some more colors to give the piece a lot more contrast; moss green iris, lavender and amethyst with gold luster beads.
I ended up finishing this piece in a couple of weeks after working on it. I actually posted the w.i.p photo's on my facebook page as I went a long, and they are still there for those who are interested in having a peek :)

I actually had a living hell making a template for the collar, lol! No, really. It's so big and wide and already shaped so I kinda had to use sticky tape, double fold it and attach it onto the collar and carefully press it down on a paper AND THEN draw around the edges of it onto the paper.
The biggest sample of Lacy's Stiff Stuff actually isn't big enough for this collar model, so I had to improvise. After I drew out the shape from my newly made template onto the beading foundation I took another piece of foundation and angled it next to the other one. I added some E6000 to the edges of each one of the two foundations and pressed them together, and I smoothed out the glue over the area of where two pieces met to make it extra secure.
My experiment actually worked and after the glue had dried the two pieces ended up together as if they'd always been there.

 I took a small break at this point, before starting to work on the collar. I wanted to make some Christmas presents to send up to some special ones, home in Sweden, making sure that they would have them on time before the 24th (we celebrate Chrsitmas EVE in Scandinavia, not Christmas Day like most other countries do, heh), and they received their gifties last week :)

When I started on the collar, I knew I wanted something sparkly and not too many details, as the other part has a lot of details. I incorporated a couple Swarovski rivolies as the focal point for it, and then I began to pretty much work from there. The design of it evolved as I worked on it. At some point however, I decided to also add a smaller feather on each side of the collar that would match up with the big feather I created on the first piece.

After finishing the collar, gluing it onto the brass piece and edging it with brick stitch I went back again to the first piece to create a fringe. One of the things I personally find hard to create is a really good fringe, lol. I find myself sometimes in a bit of a problem when doing this, depending on how the bottom shape of whatever I'm fringing looks like.
In the end I managed to come up with something awesome. I wanted something more irregular, so I chose what kind of beads I wanted to add and how; freshwater pearl, swarovski bicone crystal, 4mm firpolished bead and 3mm firpolished bead. Going from there I decided to add some 11/0 seed beads in the rose tea AB colored beads, and when I would turn up again to secure the fringe I worked peyote stitch on the seed beads laying in between those focal beads I mentioned earlier.

When the fringe was completed, it was time to finish the whole piece. After some comparing I ended up attaching the pieces with two 11/0 seed beads and an 8mm south sea shell pearl in between them.

I'm probably not gonna post another blog update before Christmas, I'm not sure :) 
But in case...
I wish you all a wonderful Christmas  

Sunday, July 22, 2012

Necklace: Cascade Coral

I've been wanting to do a cascade styled necklace for a while, but I've always postpone it and started on something else.
Last month I bought about 100g of 11/0 and 9/0 seed beads by Preciosa in coral red color. I wanted to do a cascade necklace using these colors ever since I bought some bamboo coral chip beads, which I knew would be perfect in one of these types of necklaces.
This is also the very first time I've done a chevron chain, which I found to be a very fun stitch. I suppose it's easier if you work with FireLine or Wildfire for this kind of beadwork. I used C-LON thread for this one, since I haven't used it yet and I've bought a couple of spools in different colors, among them a very dark red color that fitted perfectly with the beads. I had to pull a lot on my beadwork to keep the beads in place, that's why I think that a thread like FireLine or Wildfire would be easier to work with.
 I can't say that I really like C-LON. It's no difference in it then with Nymo, in my own opinion; It frays, it gets knots just as much and you have to condition it. At this point I wished I had picked up the red SoNo thread, lol. However I managed to get the job done in the end, even if I had some frustrating moments with the darn C-LON :P

Friday, June 29, 2012

Set: Cassiopeia

Yeh, I actually liked the palette and the theme I created for my previous post; the Cassiopeia cuff and ring and I decided to create a matching necklace for it. Nothing too complicated, but nothing too simple either, so I decided to create only a pendant that would hang from a delicate gold chain.

I used almost the same beads as I used on the other two creations for this set; the gemstone is the same, just with a different shape. 11/0 and 15/0 seed beads by Toho (gold ones here are also in a permanent finish), 11/0 seed beads and 3mm bugles by Miyuki, 2x 12mm Swarovski rivolis in two different green shades (the same as for the cuff), 2x freshwater pearls and one 4mm glass pearl by Gütermann. The only thing I didn't incorporate, which was in the previous two design was the 3mm Swarovski bicones.

For the finish of the pendant I was first planning on creating a fringe for it, but after observing the piece when I had cut it out from the Lacy's I though that a fringe might make it way too much for the piece itself to handle. Who knows? That is just how I felt at that point and that is still the was I feel today as well.
The bail I just decided to keep simple; ladder stitch, without any embellishing at all. I didn't want to take too much attention away from the pendant itself.

Sunday, June 17, 2012

Necklace: Hecate

Finally, it's done :)

I was having trouble with fringing for a while, at least in the bottom area. In the end I decided to add just a simple amethyst drop with some seed beads and 4mm Swarovski bicones along with some blue sandstone beads.
Jeez, I think I tried out three different kind of fringes at the bottom, and no matter how many I tried, it just didn't look good. Still, it looked kinda naked and I felt that something needs to be added, and I think personally that the drop does it.

As for the sides, I already had a fringe pattern in mind that I felt would work. At first though, I added the beads I wanted to work with out on the bead mat to find a sequence that would make it. For that fringe I used 11/0 and 15/0 seed beads, freshwater potato shaped pearls and 4mm Swarovski bicones.

After wearing it, I found the piece looking just finished, but yes, it is also very heavy on the front. I decided to add some heavier beads as a counter weight in the back of the necklace.

Besides the materials I've already mentioned, I used mostly 11/0 seed beads from both Matsuno and Miyuki, but also 11/0 and 15/0's from Toho.
The two cabochons on the lower sides are spangled glass caboshons. The center piece and the smaller ones are black onyxes, the redish one in the bottom, I have no idea; I received it in a mix. At first I thought it could have been some coral, but I rest that case since it doesn't really have any of those resemblance - instead I think it's a dyed milk quartz... I have a milk quartz in my collection, and this stone actually has the same surface shines that the milk quartz has, but in a different color.
The stones next to the focal are blue sandstone chips and the blue crystal like cabs above the spangled glass ones are just simple glass flat backs.
As foundation, as always, I used Lacy's Stiff Stuff and of course Ultrasuede for the backing.

Friday, April 20, 2012

Necklace: Dagr

As I mentioned in my btw post this week I was working on a simple netted lariat necklace, and yep, it's complete.

I haven't been working that much with bead-netting before, so I decided that it was time to refresh myself a bit in this, I must say, very relaxing form of beading.
It is also the first time I made a lariat necklace, which was fun and time consuming. The lariat is about 130cm (51.2") in total, with the tassels included.


The tassels are wooden beads, which I painted with an acrylic gold paint and varnished it. The bead is also covered with bead-netting.
I also mentioned in my bead table post this week that I found a use for this shiny and bright crystal/gold, silver, copper lined 11/0 Czech seed bead mix. I've been having this in my stash (aprox. 1 hank) for a bit more then a year and I'm pleased to say that the WHOLE hank was used for this lariat and not a single seed bead of it remains, lol :D
For the fringe of the tassels, I decided to mix in some 11/0 galvanized Czech gold seed beads to give some non crystal contrast to the piece.

Saturday, March 10, 2012

Necklace: Aurora

I managed to finish up the bead embroidery pendant, together with its chain yesterday and managed to get a couple of pictures of it today :)

This, as I noticed in my earlier post, is a birthday gift for my mother in law -  hope she'll like it, lol :p

To create this piece I only used 11/0 and 15/0 seed beads. Instead of a normal opaque white I decided to use the ones with an AB finish on 'em, I just love the effect. The other color is a cobalt blue with a frosted AB finish.

The cabochon is made with polymer clay in a white metallic effect color.
As for the bail, I used right angle weave and added some embellishing on two the outer edges. The small chain is in twisted herringbone stitch. I wanted a very thin, yet elegant chain to go with the pendant, but without taking away the focus from the pendant itself. I chose to make it a twisted herringbone (had already settled on a herringbone chain) of the reason that I wanted to incorporate a single strand in it with the blue color, and what other way to use the twisted variation for it?

Sunday, January 22, 2012

Twin for Free

I received my free 10 gram of Twin Beads from Preciosa this week, and they were just stunning and so cute! lol.
When I saw this offering they made I just thought "hey! free beads, must be worth trying to sign up for this" heh. They offer this to everyone that likes their Facebook page and uses the application to get a personal code to get 10 gram of free twin beads :)

I have always been a bit curious about these beads, ever since I heard that they were launched, but I haven't really seen any of my suppliers carry it until a week ago; Perles & Co. in France added some to their online store this week and I can't wait to order up some beads again. And the most awesome thing is, is that they sell them per 20 gram instead of 10 :)

Anyway.
The color I received of my free beads are purple iris. I thought that was great, cause I have about 100g of purple iris matte beads in my stash, so I decided to work together with those.
I didn't do anything complicated, as 10 gram isn't that much to move around. I wanted to try out peyote stitch with these, or even herringbone but I ended up making a very simple right angle weave bracelet/cuff.
For the last part of the bracelet I added a final row with the 11/0's and some 4mm purple glass beads that I pulled tightly together, to give a ruffled effect to the top and the bottom of the bracelet/cuff to give a fabric feeling to it. For the closure I used an acrylic button that fitted perfectly with the rest of the bracelet/cuff :)

At this point I had actually used up pretty much all of my twin beads, only 15 remained, lol. I felt that I didn't really want to store them away some where since it's such a small amount to be bothered with in the future, so I began on a circular peyote stitch, so see what it could evolve into. After two rows, using 10 beads I added 5 of the same 4mm purple glass pearls I used for the bracelet, and then I used latter stitch to attach the last five twins on top of the 5 twins that already where in the circle. Then I went through the top holes of the new twins and joined them together in a circle and formed an odd beaded bead, lol.
I ended up using some very thin silver-plated chain that I had laying around. Then a head-pin and two of the same 4mm glass pearls again together with this beaded bead and I made a wrapped loop :P
A delicate little necklace is what came out of the very last twins, lol.

Thursday, January 19, 2012

Necklace: Seth

Okey!
I finally managed to finish up this piece that I've been pondering about how the heck I should pull it out, lol.
Anyway!
I've completed part of the pendant itself last week, but I had a dilemma; I didn't know what chain I should make that possibly could go with this one.
So after some thinking, fiddling and working with other projects I decided that I would go with a rather skinny twisted herringbone chain. I wanted to keep it simple, cause I didn't want to over shine the pendant itself in any way. I know I sometimes can have a problem that I keep adding up and adding up until it really gets way too much.
But I think I managed to keep it the way I wanted, and make it just perfect :)

As for materials and techniques...
Well, I used bead embroidery to make the pendant itself. The cabochon is handmade by myself (I posted it in one of my earlier posts some time ago).
I also used some flat backs that I honestly can't remember where I got 'em from (probably dropped off from some old clothes or something... who knows? Lol at least I got to use 'em).
The green flat back at the top I peeled loose from one of my montees that I had laying around, lol. The rest of the beads are mostly 11/0's, 15/0's and 8/0's.

I had a main idea when I made the cabochon actually... I wanted to make something ancient Egypt inspired, so I carved some patterns into the cab to make it look like some sort of scarab inspired... Thing. It quickly changed when I began evolving the bead embroidery after I bezelled it. I ended up with something that looks like and eye on each side, so... I guess it's more surrealistic and free-form then something planned, but it normally end up like a free-form piece for some reason when I work with bead embroidery. 

Thursday, January 12, 2012

Necklace: Perspective

Yesterday I pulled my act together and finished up my latest bead embroidery piece.
It ended up as a necklace, with the polymer clay cabochon I made about two weeks ago.
I was a bit worried when I finished up the part where I attached the chain to the pendant; I chose to make two separate chains and attach 'em directly to the pendant instead of making a bail, which I usually go for.
However, it ended up looking perfect, and it lays perfect onto the body when wearing it.
I decided to add a fringe to the bottom of each chain where they are attached to the pendant since it looked  a bit naked.
I attacked a toggle-clasp as closure in silver-plated silver.


This is my entry for January's moodboard on Operation Tackle That Bead Stash! :)

Related Posts Plugin for WordPress, Blogger...